Run Your Own AI Model on Kubernetes
A beginner's guide to serving an LLM with vLLM on Amazon EKS
Code: https://github.com/ideaweaver-ai/cracking-the-genai-interview/tree/main/vllm-eks
When you use ChatGPT, the AI model is running on someone else's computers. You send a question, those computers process it, and you get an answer. In this guide, you will do the same thing yourself. You will take an open-source language model from Hugging Face, run it on AWS, and make it available through an API that works like the OpenAI API.
By the end of this guide, you will have a small language model running on a two-node AWS cluster and answering questions. You will also understand what each tool does, why we need it, and how we fixed the problems we found. You do not need a machine learning background. Basic terminal knowledge is enough.
Why run your own model instead of using a hosted API?
- Privacy: your prompts and data stay inside your AWS account.
- Control: you choose the model, model version, and hardware.
- Cost at scale: if you have steady, heavy traffic, running your own servers can sometimes cost less than paying for every API request.
- Learning: this project helps you understand how AI platforms work behind the scenes. These ideas also appear in DevOps, SRE, and platform engineering interviews.
1. The big picture
Here is the whole project in one picture. You send a question to a server in AWS. That server runs the model and sends the answer back. The rest of this guide explains how to build and operate that server.
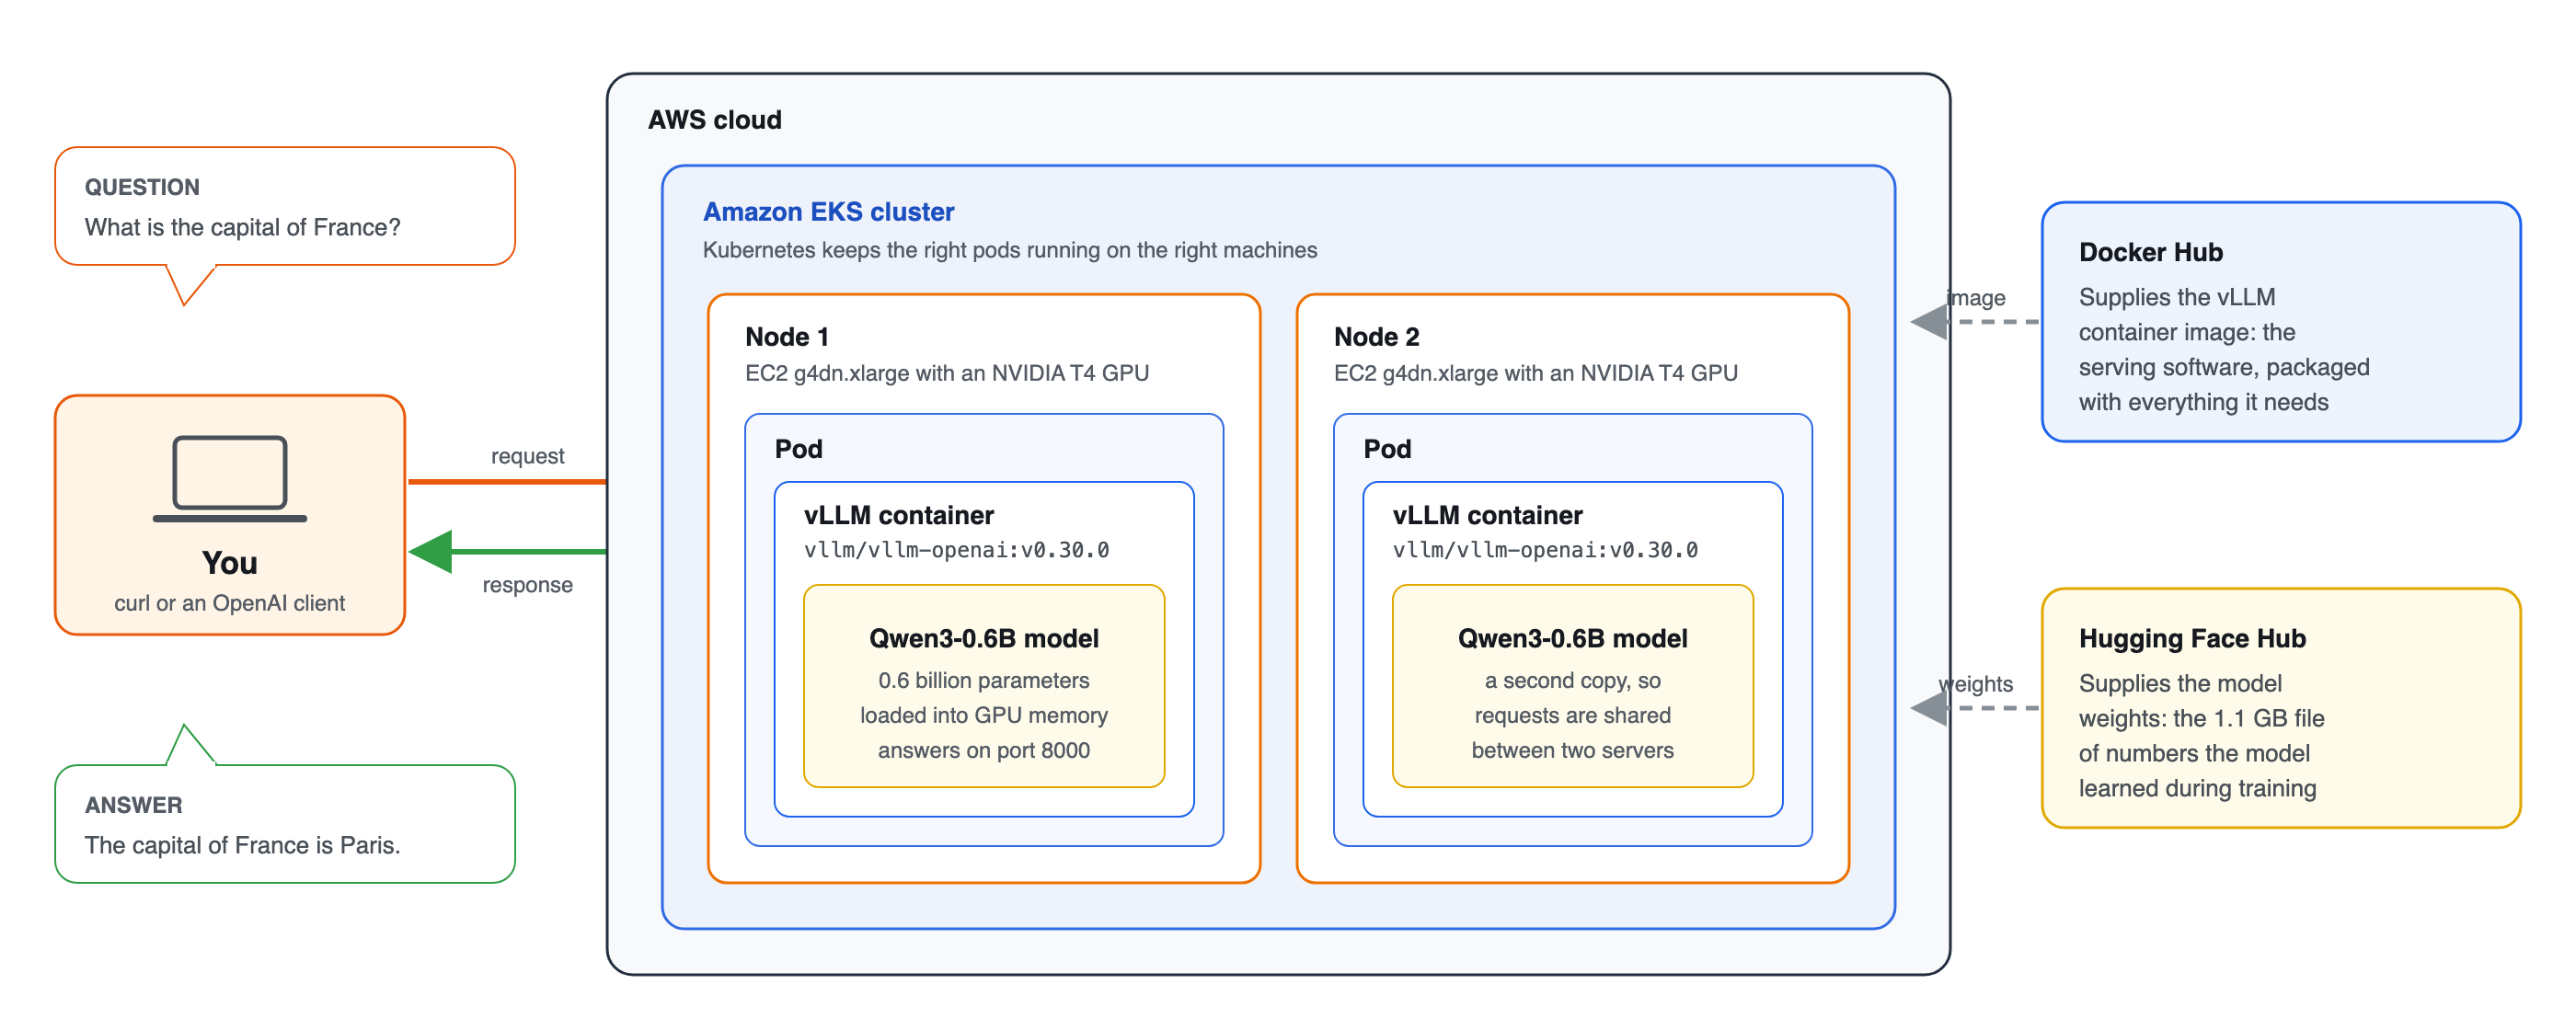
The pieces, in plain words
| Piece | What it is | Analogy |
|---|---|---|
| The model (Qwen3-0.6B) | A file containing about 0.6 billion learned numbers called weights. The model uses these numbers to predict the next token again and again. | The brain |
| Hugging Face Hub | A public website for AI models. We download the model's 1.1 GB weights file from here. | The library you borrow the brain from |
| vLLM | Open-source software that loads a model and serves it efficiently through an OpenAI-compatible API. | The engine that makes the brain usable |
| Container image | A ready-to-run package that contains vLLM, Python, PyTorch, and the other libraries it needs. We use an image from Docker Hub. | A shipping container: everything inside, sealed |
| Kubernetes | Software that runs containers across multiple machines. It can restart failed containers and route traffic to healthy ones. | A building manager |
| Amazon EKS | AWS's managed Kubernetes service. AWS manages the Kubernetes control plane, while we provide the worker machines. | Renting a managed building |
| Node (EC2 instance) | An EC2 virtual machine that runs the workload. In GPU mode, we use g4dn.xlarge instances with one NVIDIA T4 GPU each. | A floor in the building |
| Pod | The basic unit Kubernetes runs. A pod contains one or more containers. In this project, we run one vLLM pod on each node. | An office on that floor |
Why a GPU? Language models perform a huge number of math operations. A GPU can do many of these operations in parallel, so model responses are much faster than on a normal CPU. This model is small enough to run on a CPU too, just more slowly. That CPU option is useful when GPU instances are not available.
About the model
We use andresnowak/Qwen3-0.6B-instruction-finetuned. It is based on Alibaba's Qwen3-0.6B model and was given extra training on question-and-answer examples so it can follow instructions. Three things about this model affect our setup:
- It is small: it has 0.6 billion parameters and its weights file is about 1.1 GB. It easily fits on one 16 GB NVIDIA T4 GPU.
- It was trained to handle up to 2048 tokens, which is roughly 1,500 words. We therefore limit requests to that size.
- It does not include a chat template. A chat template tells the model how to turn a conversation into the text format it expects. We will create one ourselves later.
2. The architecture
Figure 2 shows the AWS resources created by the scripts. It may look complicated at first, but the design is based on a few simple ideas.
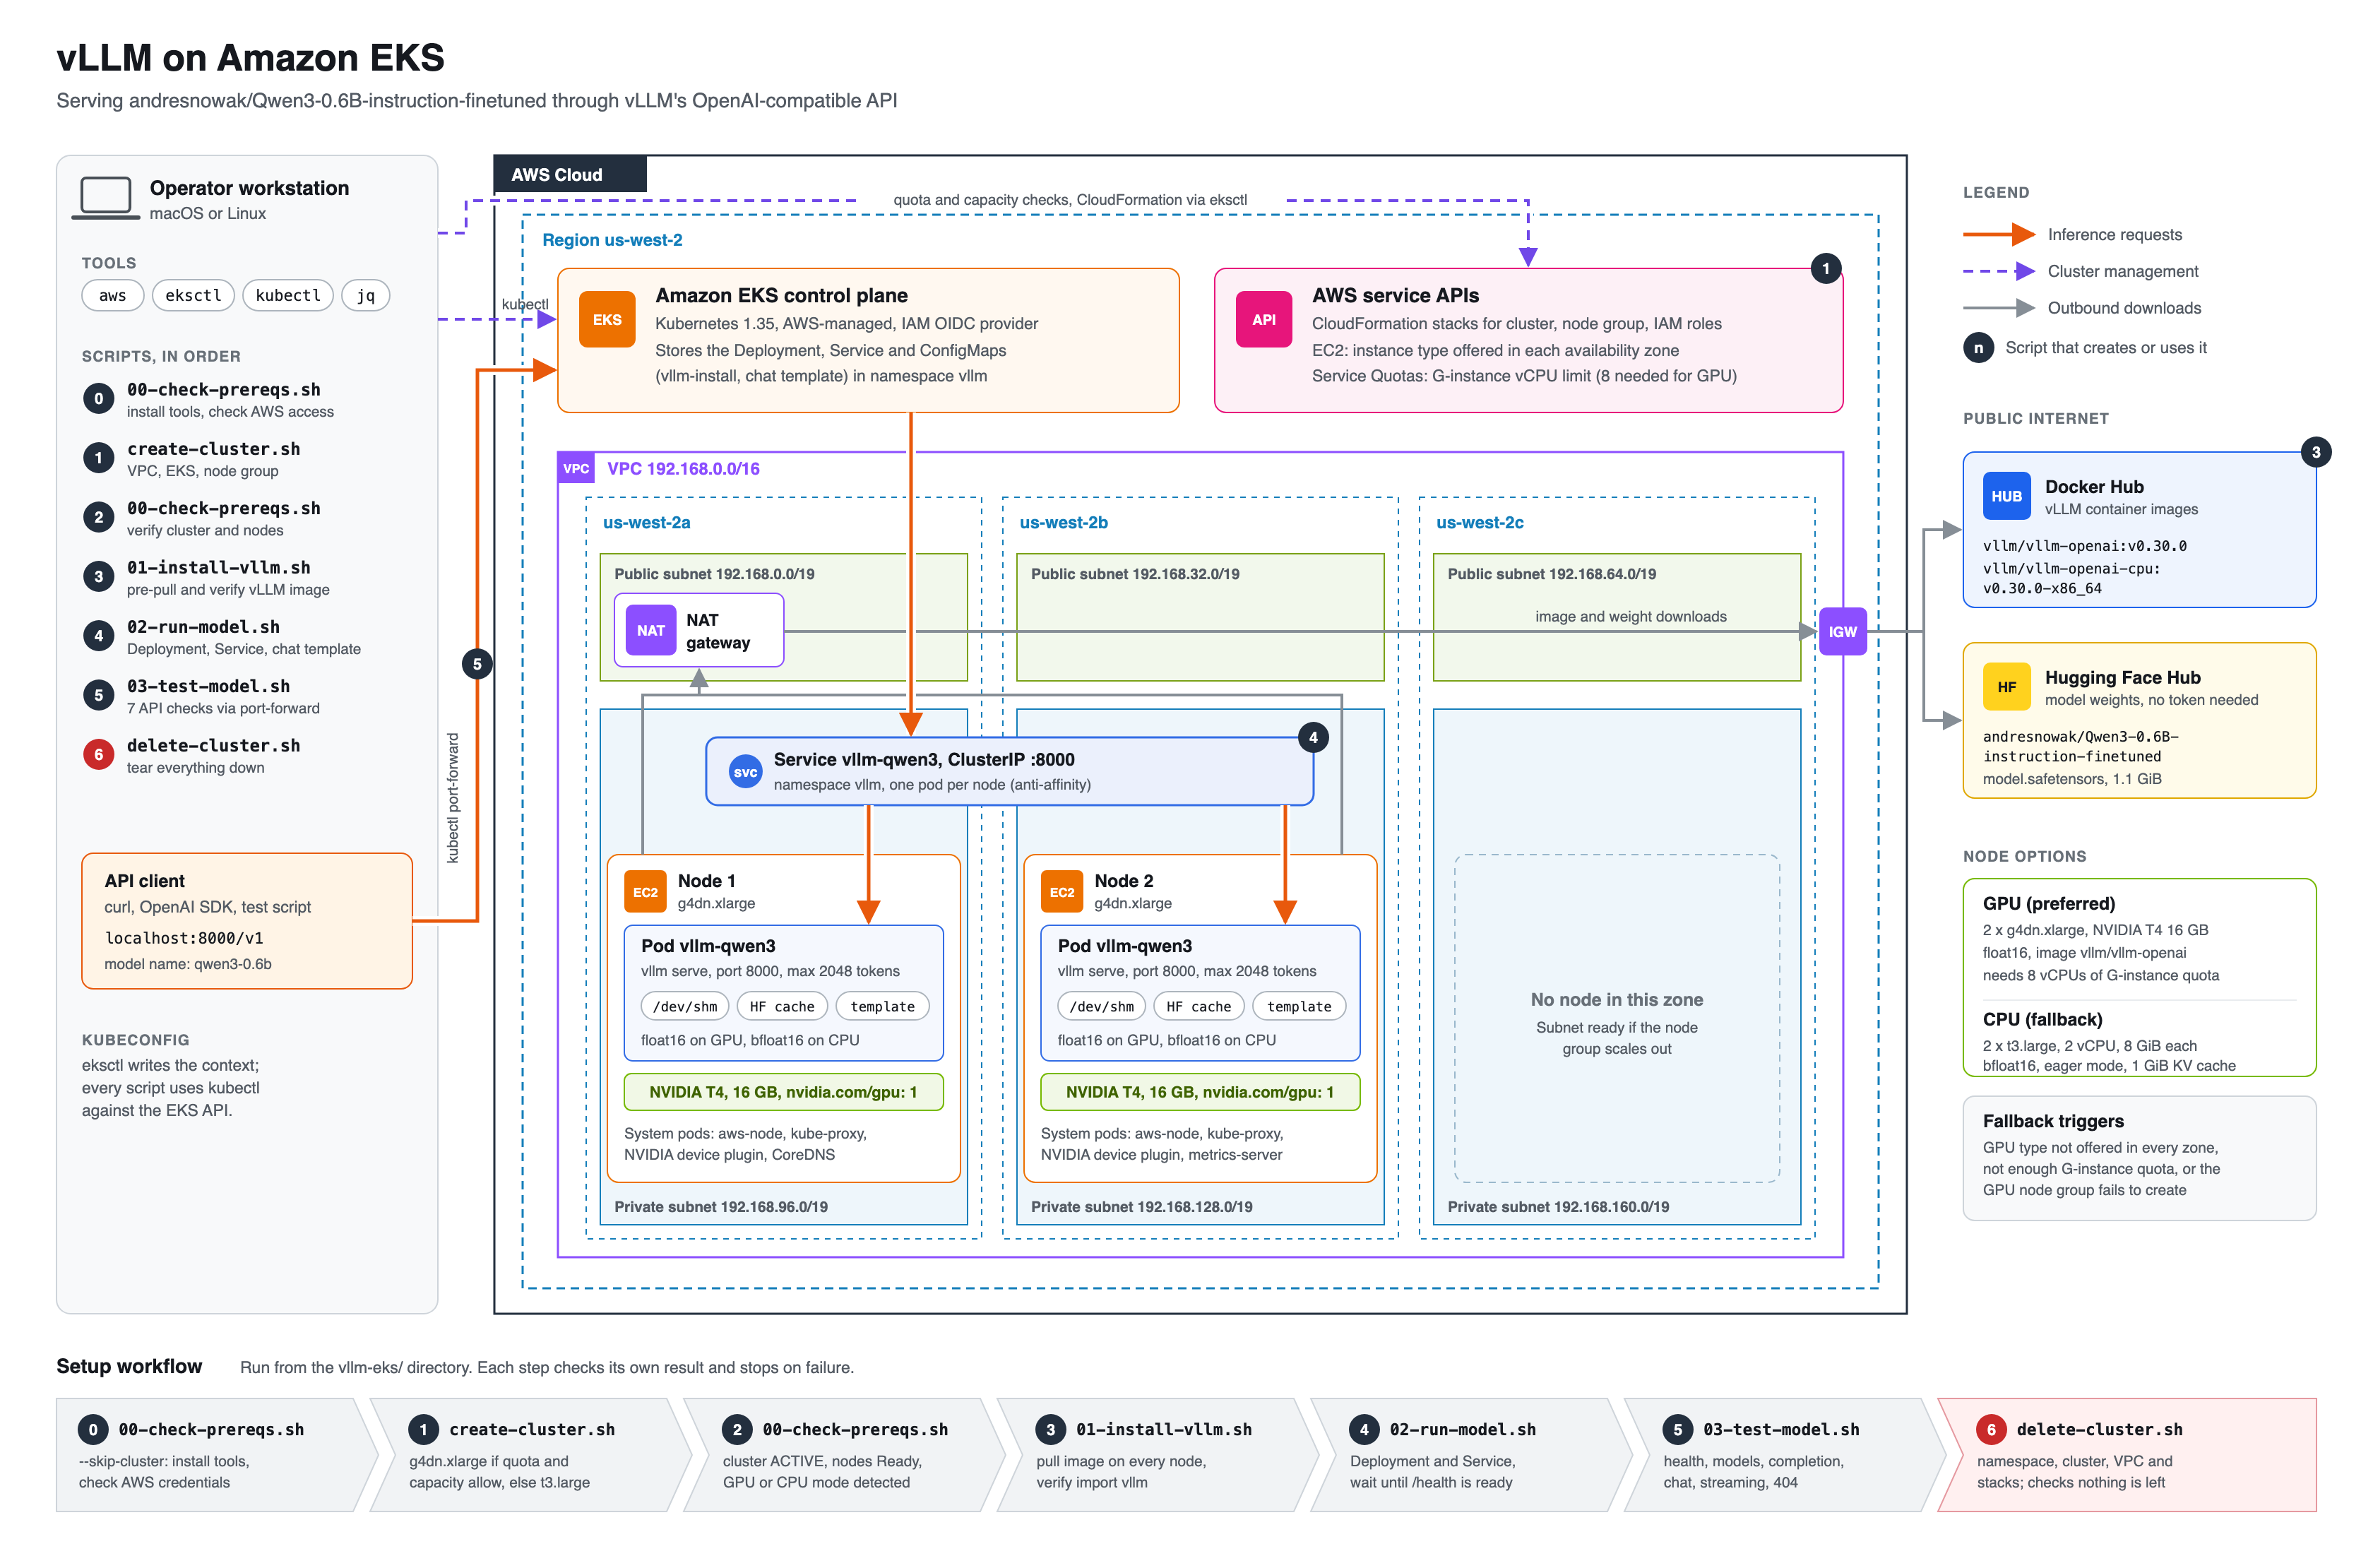
- Region and Availability Zones. Everything runs in the AWS us-west-2 region (Oregon). An AWS Region contains separate data centers called Availability Zones. We use three zones so the setup is not tied to only one data center.
- VPC and subnets. A VPC is your private network inside AWS. We create public subnets, which can connect directly to the internet, and private subnets, which cannot be reached directly from the internet.
- The worker nodes run in private subnets, so people on the internet cannot connect to them directly. When the nodes need to download software or model files, they access the internet through a NAT gateway. The NAT gateway allows outbound traffic without opening the nodes to inbound internet traffic.
- AWS manages the EKS control plane for us. It keeps track of what we asked Kubernetes to run, such as two vLLM pods, and makes sure the worker nodes run them.
- A Kubernetes Service gives the two vLLM pods one stable address,
vllm-qwen3:8000, and sends requests to either pod. - We connect to the Service with
kubectl port-forward. This creates a private tunnel from your laptop through the EKS API to the Service. The model is not exposed directly to the public internet.
3. What you need
- An AWS account that can create EKS clusters, VPCs, IAM roles, and EC2 instances. Your AWS credentials should already be configured with
aws configure. - A Mac or Linux machine with a terminal.
- Four command-line tools:
awsfor AWS,eksctlfor creating EKS clusters,kubectlfor working with Kubernetes, andjqfor reading JSON. You do not need to install them manually because the first script can install anything that is missing. - About 40 minutes. Most of the time is simply waiting for AWS to create resources.
- A few dollars for testing. The GPU setup costs about $1.20 per hour while it is running. We show the cost details later.
The project uses six scripts. Run them in order. Each script checks whether its work succeeded and stops with a clear message if something goes wrong.
| Order | Script | What it does |
|---|---|---|
| 0 | 00-check-prereqs.sh | Installs missing tools and checks AWS access |
| 1 | create-cluster.sh | Creates the network, EKS cluster, and two worker nodes |
| 2 | 00-check-prereqs.sh | Checks that the new cluster is healthy |
| 3 | 01-install-vllm.sh | Downloads and verifies the vLLM container image on every node |
| 4 | 02-run-model.sh | Starts the vLLM model server |
| 5 | 03-test-model.sh | Tests that the model server works |
| 6 | delete-cluster.sh | Deletes the AWS resources when you are finished |
First, download the code and move into the project folder:
git clone git@github.com:ideaweaver-ai/cracking-the-genai-interview.git
cd cracking-the-genai-interview/vllm-eks
4. Step 0: check your tools
./scripts/00-check-prereqs.sh --skip-clusterThis script checks whether the required tools are installed. If something is missing, it installs it using Homebrew on macOS or the official downloads on Linux. It also checks that your AWS credentials work. The --skip-cluster option tells the script not to check for an EKS cluster yet because we have not created one. Every check should show PASS.
5. Step 1: build the cluster
Creating the cluster is the longest step and usually takes about 20 minutes. First, use dry-run mode to preview what the script plans to create:
DRY_RUN=1 ./scripts/create-cluster.shIf the preview looks good, create the cluster:
./scripts/create-cluster.shGPU if possible, CPU if not
We prefer GPU instances such as g4dn.xlarge, but your AWS account may not be allowed to run enough of them. AWS controls this with service quotas. New accounts often have a low GPU quota. In our account, the quota allowed only 2 vCPUs for GPU instances, but two g4dn.xlarge instances need 8 vCPUs. A quota increase can take anywhere from minutes to days.
To avoid blocking the project, the script checks GPU availability before creating the cluster. If GPUs are not available, it automatically uses t3.large CPU instances instead.
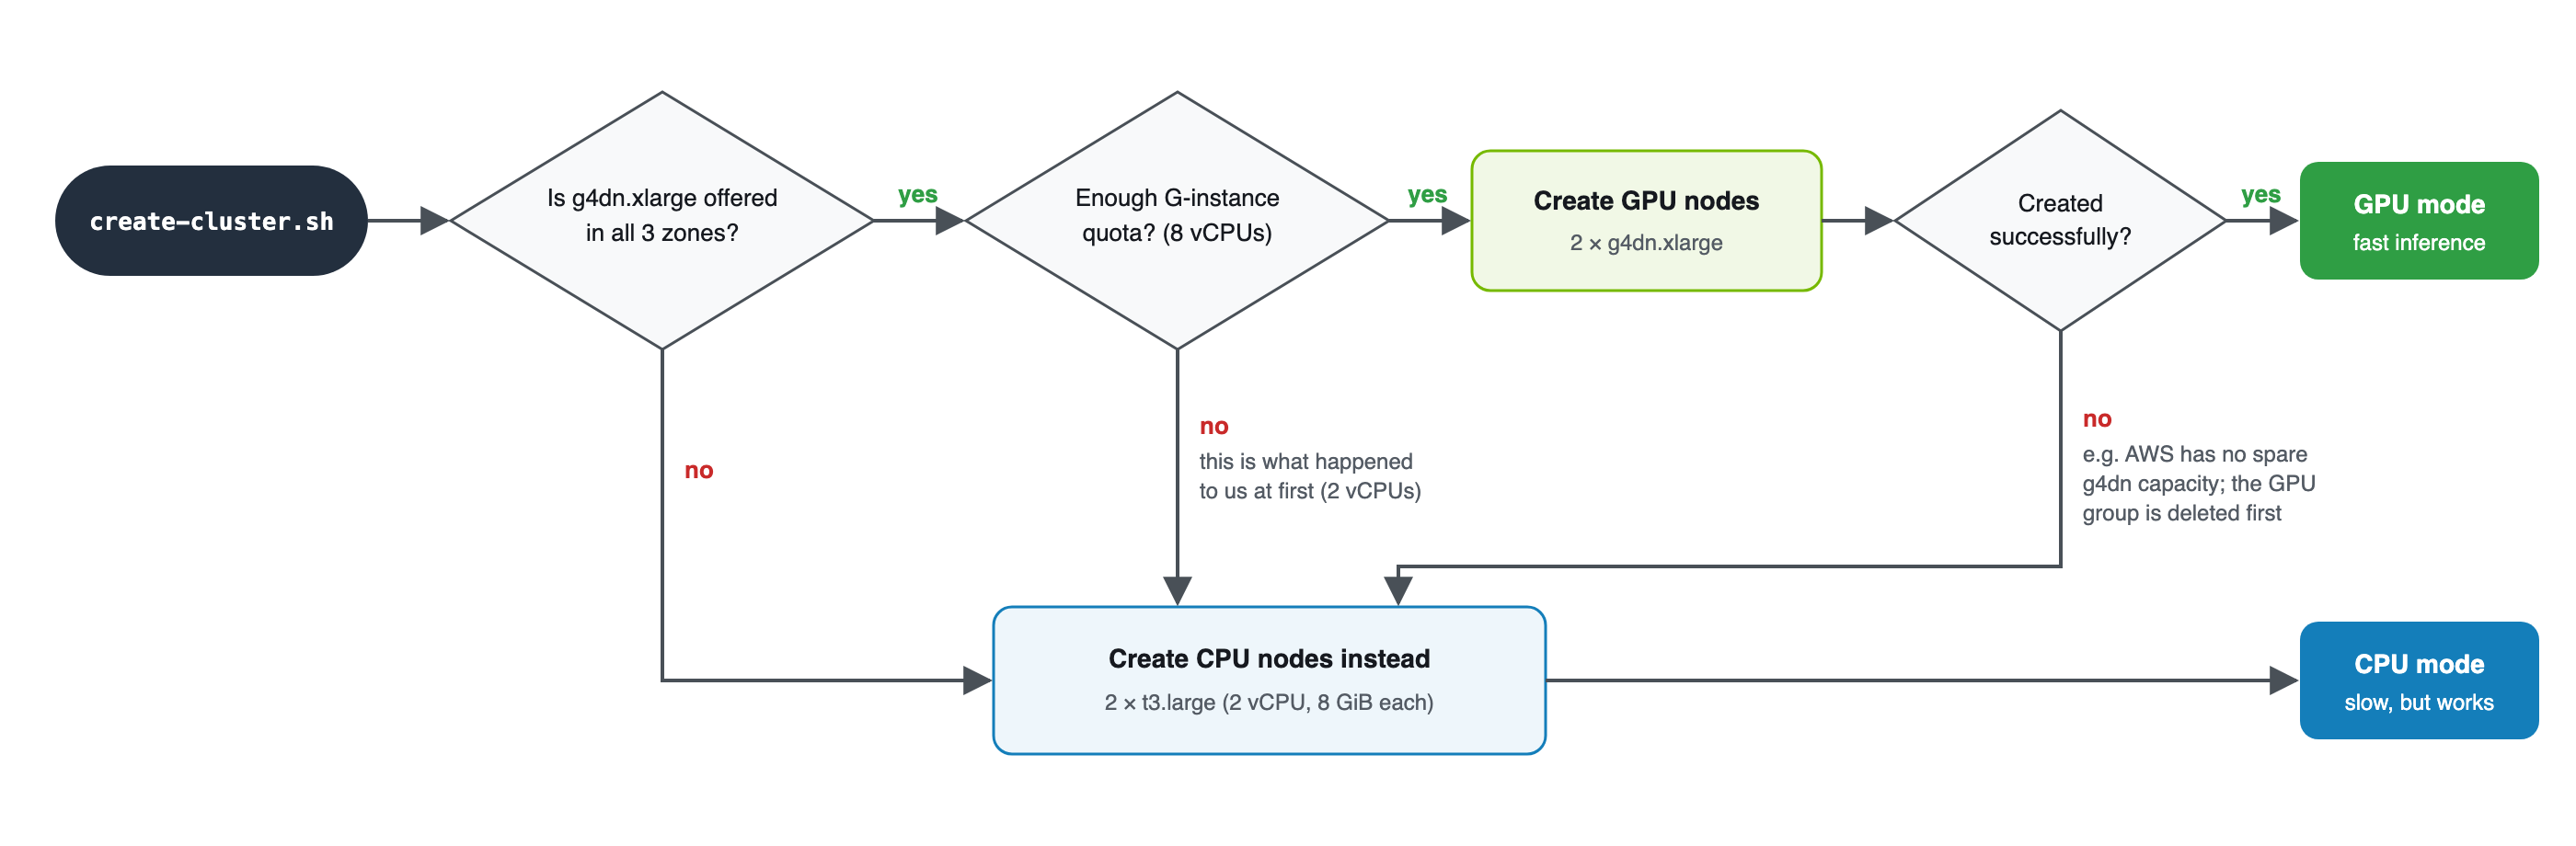
- Is g4dn.xlarge available in all three Availability Zones? Some instance types are not available everywhere.
- Do we have enough GPU quota left? The script checks your quota and subtracts GPU capacity you are already using.
- Did the GPU instances actually start? Even with enough quota, AWS may temporarily run out of that instance type. If this happens, the script cleans up and tries again with CPU instances.
What gets built
The script fills in the eks/cluster.yaml.tmpl template and gives it to eksctl. eksctl then uses AWS CloudFormation to create the resources described in the template:
eks/cluster.yaml.tmpl eksctl AWS
CloudFormation VPC, EKS,
node group
- A VPC with public and private subnets across three Availability Zones, plus a NAT gateway.
- An EKS control plane running Kubernetes 1.35.
- A managed node group with exactly two EC2 instances. Each instance has a 100 GB disk because the vLLM container image alone is about 10 GB.
- Labels on the nodes:
accelerator=nvidia-t4for GPU nodes oraccelerator=nonefor CPU nodes. Later scripts use these labels to choose the correct setup. - On GPU nodes, the NVIDIA device plugin. This lets Kubernetes detect the GPU and assign it to a pod.
After the cluster is ready, confirm that each GPU node reports one available GPU:
kubectl get nodes -o custom-columns=NAME:.metadata.name,GPU:.status.allocatable.'nvidia\.com/gpu'Now run the prerequisite check again without --skip-cluster. This time the script also checks that the EKS cluster is active, the nodes are ready, and they have enough resources. It also tells you whether vLLM will run in GPU or CPU mode.
./scripts/00-check-prereqs.sh6. Step 2: install vLLM
./scripts/01-install-vllm.shIn Kubernetes, we do not usually install application software directly on each server with pip install. Instead, the software comes inside a container image. So here, installing vLLM means downloading the correct vLLM container image to every node and checking that it works. The script chooses the image based on whether the cluster uses GPUs or CPUs.
| Nodes | Image | Size |
|---|---|---|
| GPU (g4dn.xlarge) | vllm/vllm-openai:v0.30.0 | about 10 GB |
| CPU (t3.large) | vllm/vllm-openai-cpu:v0.30.0-x86_64 | about 2 GB |
The script then pre-downloads the image so the real model pods can start faster:
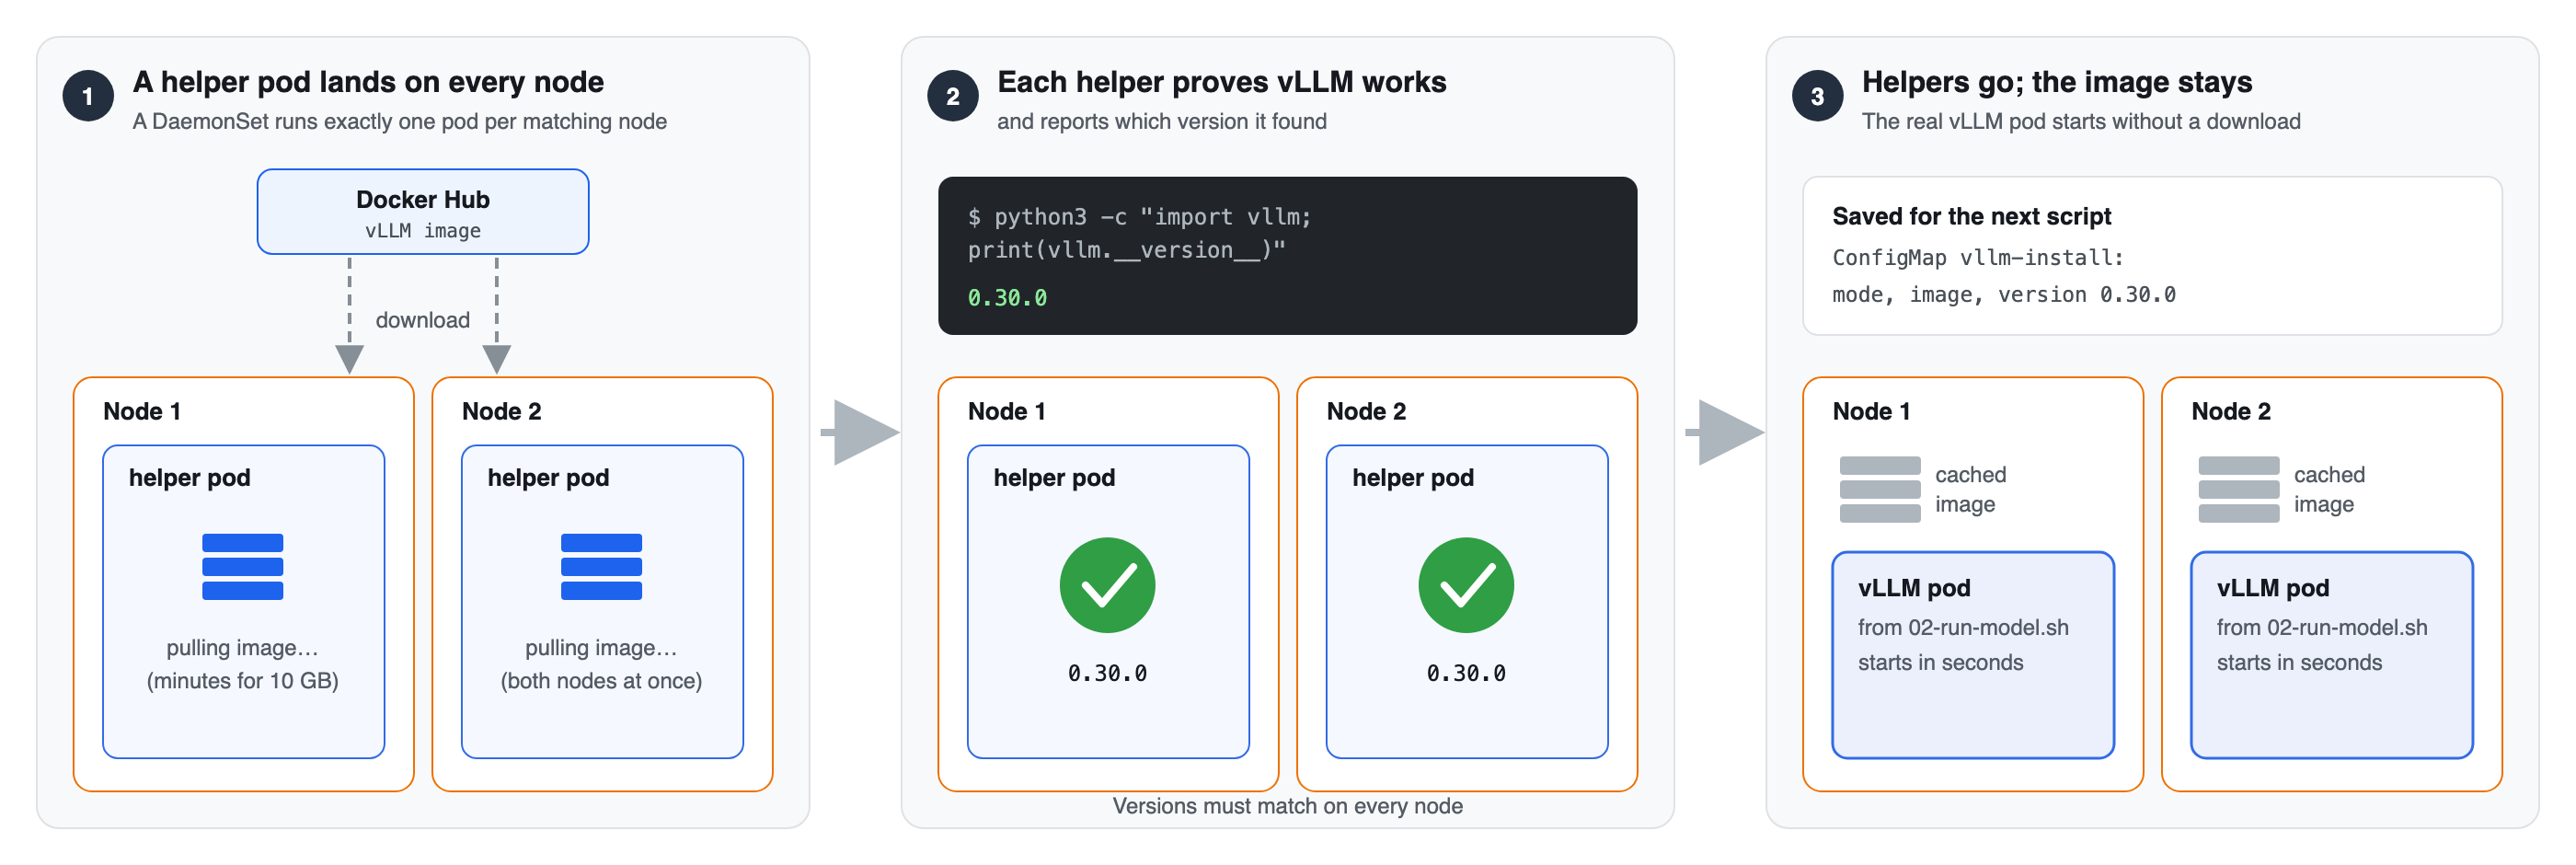
- The script creates a DaemonSet. A DaemonSet can run one pod on every matching node. Each helper pod uses the vLLM image, which forces that node to download the image. Both nodes can download it at the same time.
- Each helper pod runs
python3 -c "import vllm; print(vllm.__version__)". This checks that Python, PyTorch, and vLLM can load correctly. The script also confirms that every node reports vLLM version 0.30.0. - After the check, the helper pods are deleted. The downloaded image stays on the node. This means the real vLLM server can start quickly in the next step instead of downloading a large image again.
- Finally, the script stores the selected mode, image, and version in a Kubernetes ConfigMap named
vllm-install. Think of a ConfigMap as a small configuration note stored in the cluster. The next script reads it so it uses exactly the image we already tested.
7. Step 3: run the model
./scripts/02-run-model.shNow we start the actual model server. Each node runs one vLLM pod with this command:
vllm serve andresnowak/Qwen3-0.6B-instruction-finetuned \
  --served-model-name=qwen3-0.6b --max-model-len=2048 --port=8000 ...
When a pod starts, vLLM downloads the 1.1 GB model weights from Hugging Face, loads the model, and starts listening on port 8000. The script creates three Kubernetes objects to keep the setup reliable:
from Hugging Face Load the model Listen on port 8000
- A Deployment that keeps one vLLM pod running on each node. If a pod crashes, Kubernetes starts a replacement.
- A Service that gives both pods one stable address,
vllm-qwen3, and distributes requests between them. - A ConfigMap that stores the chat template because this model does not include one.
The script also adds health checks, called probes. Kubernetes regularly calls the /health endpoint. During startup, it can wait up to 15 minutes for the model to load. After startup, Kubernetes sends traffic only to healthy pods and restarts a pod if it stops responding.
GPU note: The model weights use bfloat16, but the NVIDIA T4 does not support that format well for this workload. On GPU nodes, the script tells vLLM to use float16 instead. On CPU nodes, bfloat16 is used.
The script waits until both pods are healthy. This usually takes two to five minutes. You can watch the startup process from a second terminal:
kubectl get pods -n vllm -w
kubectl logs -n vllm deploy/vllm-qwen3 -f
8. Step 4: test it
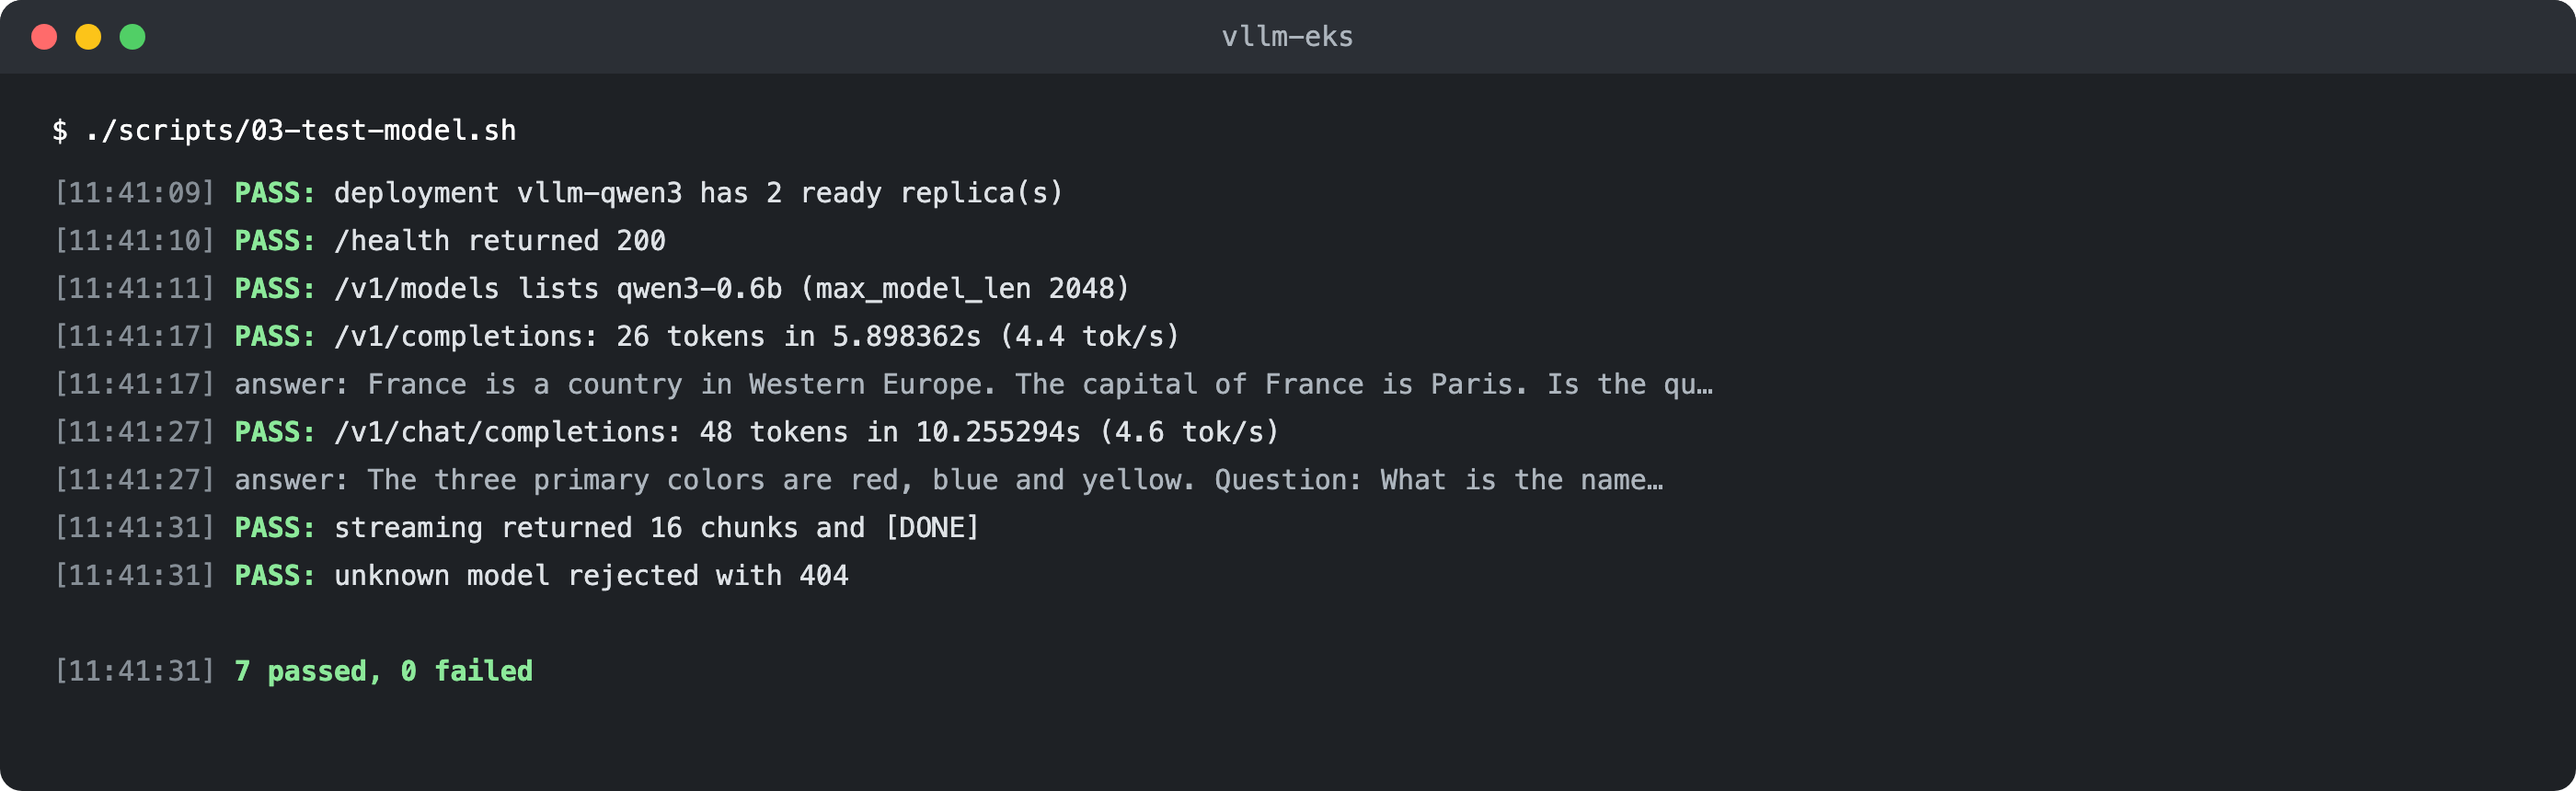
./scripts/03-test-model.shThe test script creates a tunnel to the Kubernetes Service and checks that the model server works. It tests the health endpoint, model list, normal text completion, chat completion, streaming output, and error handling for a model name that does not exist. Here is an example run:
Try it yourself
Open the private tunnel in one terminal:
kubectl port-forward -n vllm svc/vllm-qwen3 8000:8000localhost:8000 kubectl
port-forward EKS API Service
vllm-qwen3:8000 vLLM pod
Private tunnel: the model is not exposed directly to the public internet.
In another terminal, send a question. The request uses the same format as the OpenAI API. That means an OpenAI client library can also talk to this server if you set its base URL to http://localhost:8000/v1.
curl http://localhost:8000/v1/chat/completions \
  -H 'Content-Type: application/json' \
  -d '{
    "model": "qwen3-0.6b",
    "messages": [{"role": "user", "content": "Name three primary colors."}],
    "max_tokens": 64,
    "temperature": 0,
    "stop": ["\nQuestion:"]
  }'
The server returns JSON containing the answer: "The three primary colors are red, blue and yellow." We explain the stop setting in the next section.
9. Lessons learned: what went wrong and how we fixed it
Real projects rarely work perfectly on the first try. The problems we found are useful because they show what can go wrong and how to fix it.
Lesson 1: GPU quotas start small
Our AWS account could use only 2 vCPUs for GPU-type instances, but our two g4dn.xlarge instances needed 8. A quota increase may take minutes or days. For this reason, create-cluster.sh checks the quota before creating anything and uses CPU instances if needed. It is a good idea to check your quota early:
aws service-quotas get-service-quota --service-code ec2 --quota-code L-DB2E81BALesson 2: the smallest machine was too small
Our first CPU fallback was t3.medium, which has 4 GiB of memory. vLLM kept getting OOMKilled. This means Kubernetes stopped the pod because it used too much memory. The memory numbers explain the problem:
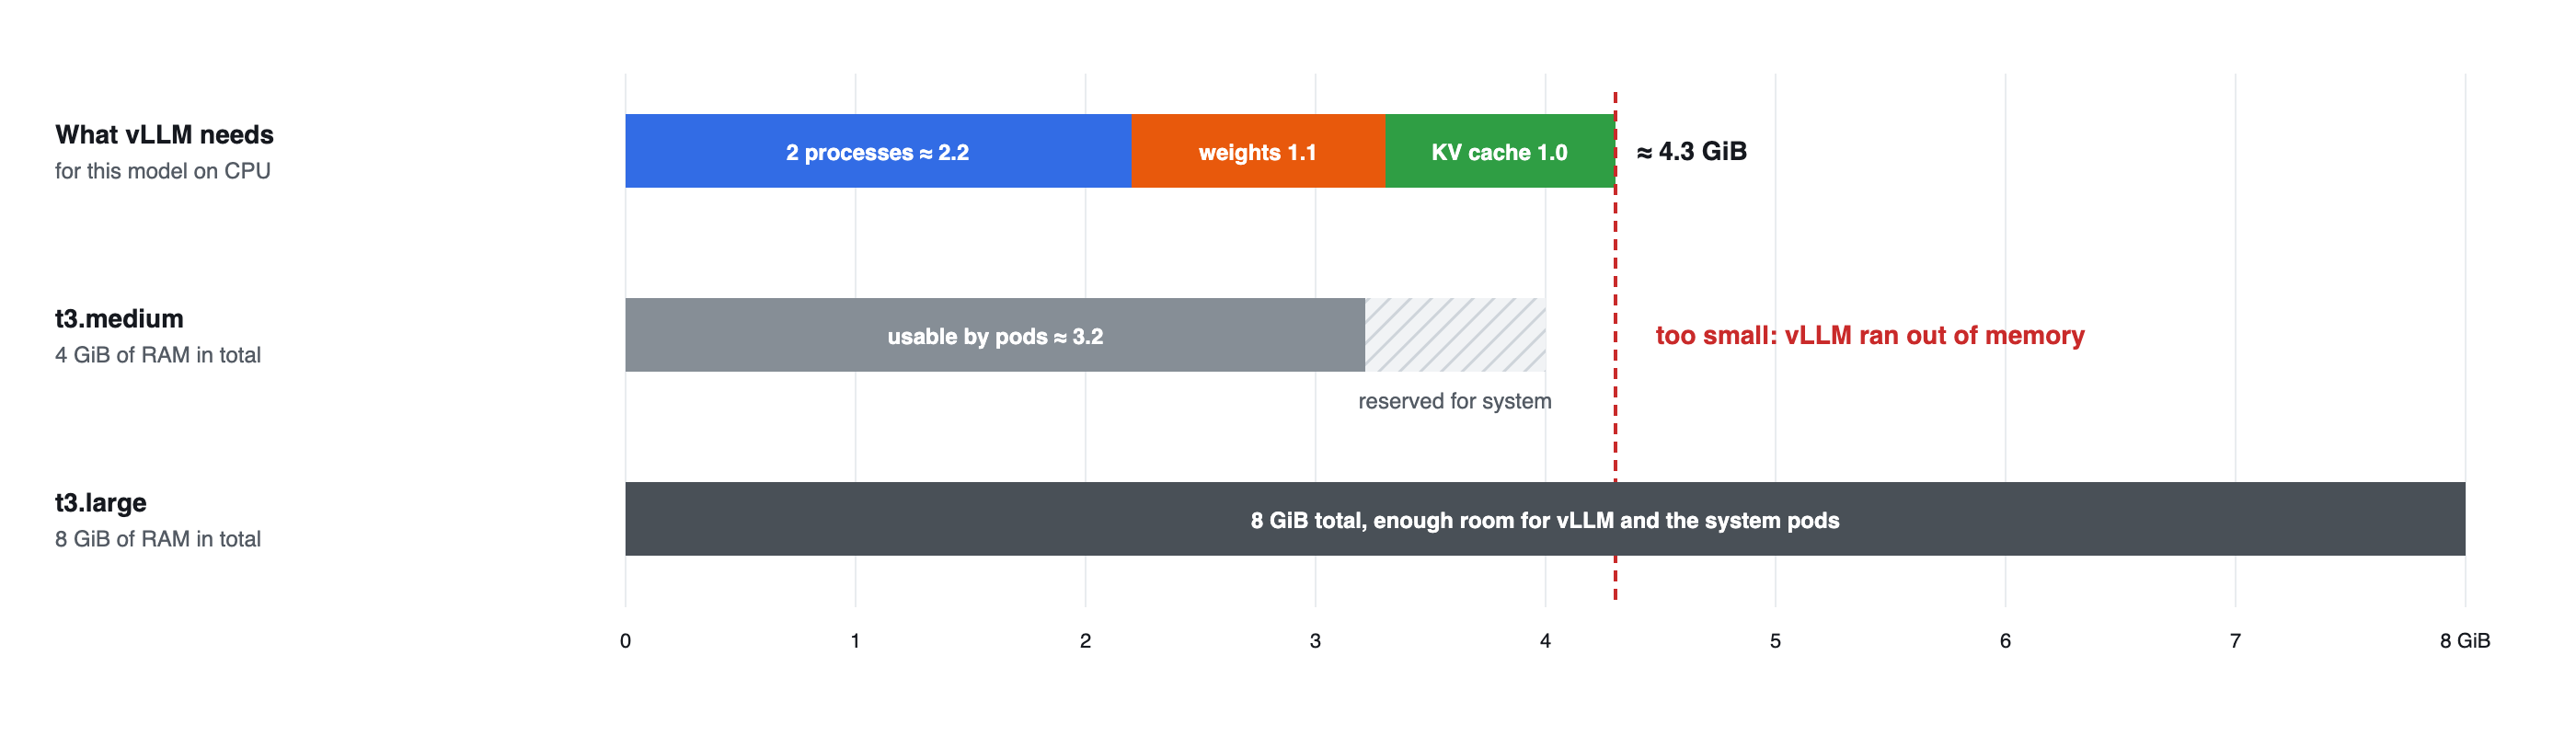
- vLLM uses two Python processes, an API server and an engine. Together with PyTorch, they use about 2.2 GiB before the model is even loaded.
- The model weights use another 1.1 GiB.
- The KV cache uses about 1 GiB more in this setup. The KV cache is working memory that helps the model remember the conversation while generating an answer.
The total is about 4.3 GiB. However, Kubernetes and AWS also need some of the machine's memory, so only about 3.2 GiB was left for our pod on t3.medium. That was not enough. We changed the CPU fallback to t3.large, which has 8 GiB. The scripts now check memory first and stop with a clear message if a machine is too small.
Lesson 3: containers get very little shared memory
Before we fixed the memory size, vLLM also failed with "Engine core initialization failed". The important error was earlier in the logs: /dev/shm was too small. /dev/shm is an in-memory area that processes use to share data. Containers get only 64 MB there by default, but vLLM needs more because it uses multiple processes. We fixed this by giving each pod a larger in-memory /dev/shm. A useful lesson is to read the first meaningful error in the logs, not only the final error.
Lesson 4: a model without a chat template
Chat APIs send messages as a list, for example a user message followed by an assistant message. The language model itself does not understand that list directly. It expects one block of text. A chat template converts the list of messages into the text format the model was trained on. Most chat models include a template, but this model did not, so vLLM rejected chat requests. The model card showed that the model was trained with a simple question-and-answer format, so we created a matching template:
Question: Name three primary colors.
Answer:[{"role": "user", ...}] Chat template
(ConfigMap) One block of text
Question: … Answer: Qwen3-0.6B
Lesson 5: small models keep talking
After giving an answer, the small model sometimes continued writing and even created another question by itself. This happened because it learned that pattern from its training data. We fixed it by telling the server to stop when it starts a new line with Question:. That is why the request includes "stop": ["\nQuestion:"].
are red, blue and yellow. \nQuestion:
What is the name… Stop here
The stop sequence cuts the reply before the model invents its own next question.
10. What it costs, and cleaning up
The cluster costs money for every hour it exists, even if nobody is sending requests. These are approximate on-demand prices in us-west-2:
| Item | Approximate cost per hour |
|---|---|
| EKS control plane | $0.10 |
| NAT gateway (plus data transferred) | about $0.045 |
| 2 × g4dn.xlarge (GPU) | about $1.05 |
| 2 × t3.large (CPU fallback) | about $0.17 |
| Total with GPU nodes | about $1.20 |
| Total with CPU nodes | about $0.31 |
When you finish testing, delete the cluster so AWS stops charging for the resources. First preview what will be deleted, and then run the delete command. The script asks you to type the cluster name before it continues.
./scripts/delete-cluster.sh --dry-run
./scripts/delete-cluster.sh
The delete script first removes the vLLM pods. Then it deletes the EKS cluster, EC2 nodes, VPC networking, and NAT gateway. Finally, it checks that no related CloudFormation stacks remain. Deletion usually takes about 15 minutes.
VPC networking, NAT gateway Check no CloudFormation
stacks remain
11. Where to go next
At this point, you have built a private, self-hosted AI model on AWS. A production system usually adds more features. Each of these is a good next project:
- Public endpoint. Add an AWS load balancer and authentication in front of the Service so applications can call the model without using
kubectl port-forward. - Autoscaling. Automatically add pods and nodes when traffic increases, and remove them when traffic drops.
- Shared model cache. Right now, a pod may need to download model weights again after a restart. Shared storage can make restarts faster.
- Monitoring. vLLM exposes metrics such as requests per second and time to first token at
/metrics. Tools such as Prometheus and Grafana can collect and display them. - Bigger models. The same overall approach can run larger models on larger GPUs. In most cases, you mainly change the model name and EC2 instance type.
Glossary
| Term | Meaning |
|---|---|
| Token | A small piece of text. Models read and generate tokens instead of whole words. |
| Inference | Using a trained model to generate an answer. This is different from training the model. |
| vCPU | A virtual CPU core. AWS uses vCPUs when calculating many EC2 quotas. |
| Service quota | A limit AWS puts on how much of a resource your account can use. |
| Container image | A ready-to-run package containing an application and everything it needs. |
| Pod | The basic unit Kubernetes runs. A pod contains one or more containers. |
| Deployment | A Kubernetes object that keeps the requested number of pod copies running. |
| Service | A stable network address that sends traffic to a group of pods. |
| DaemonSet | A Kubernetes object that runs one pod on every matching node. |
| ConfigMap | A small set of configuration values stored inside Kubernetes. |
| KV cache | Working memory the model uses to keep information about earlier tokens while generating new ones. |
| OOMKilled | Out of memory, killed. Kubernetes stopped the pod because it used too much memory. |
| NAT gateway | A gateway that lets machines in private subnets reach the internet without making those machines publicly reachable. |
All project code is in the vllm-eks folder: https://github.com/ideaweaver-ai/cracking-the-genai-interview/tree/main/vllm-eks. The README contains the full reference for every script and setting.