Build a GitHub PR Reviewer with n8n
In Day 7, we learned the basic ideas behind AI agents: prompts, tools, and how an AI system can use external tools to complete a task. Today, we are going to build something practical.
First, get n8n running locally ↓
Install Docker with n8n
Before we build the PR reviewer, you need n8n running on your machine.
Official install options are here: Install n8n with Docker.
Create a Docker volume for n8n data:
docker volume create n8n_data
Then start n8n:
docker run -it --rm \
 --name n8n \
 -p 5678:5678 \
 -e GENERIC_TIMEZONE="America/Los_Angeles" \
 -e TZ="America/Los_Angeles" \
 -e N8N_ENFORCE_SETTINGS_FILE_PERMISSIONS=true \
 -e N8N_RUNNERS_ENABLED=true \
 -v n8n_data:/home/node/.n8n \
 docker.n8n.io/n8nio/n8n
After it starts, open http://localhost:5678 in your browser.
Prefer watching the GitHub PR Reviewer workflow being built step by step?
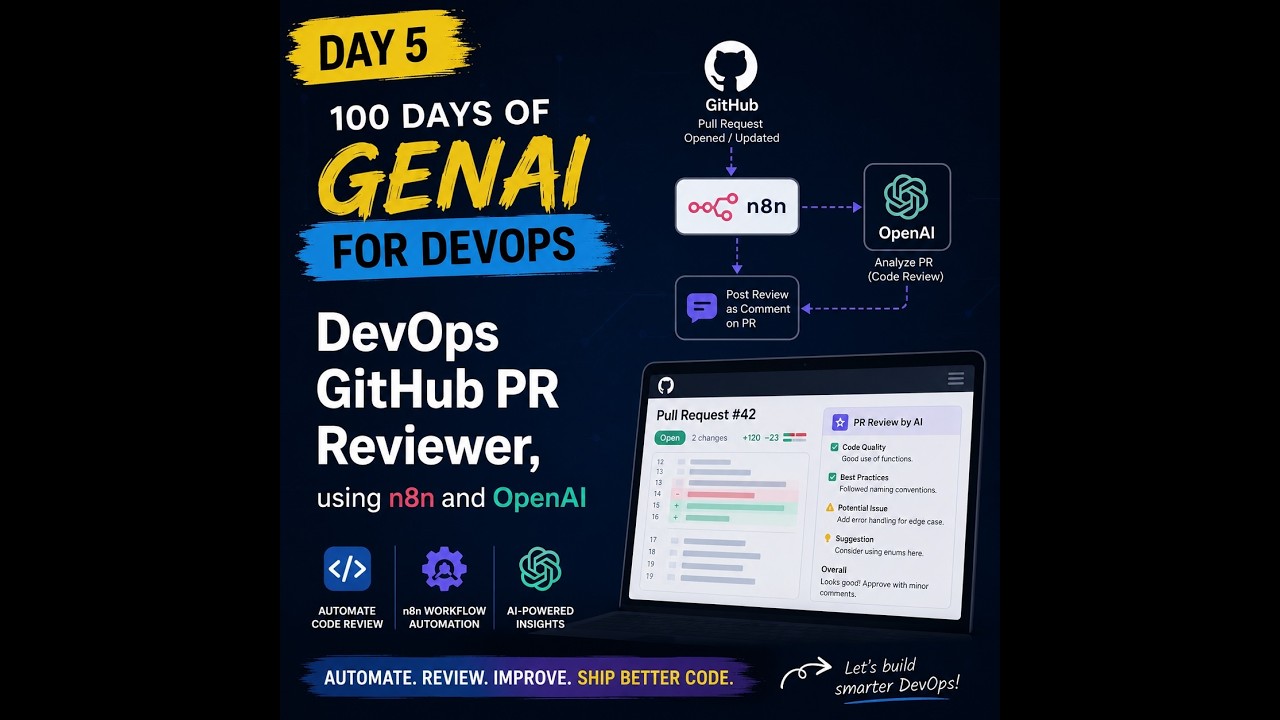
We will create an AI-powered GitHub Pull Request Reviewer using n8n, GitHub, and OpenAI.
The idea is simple:
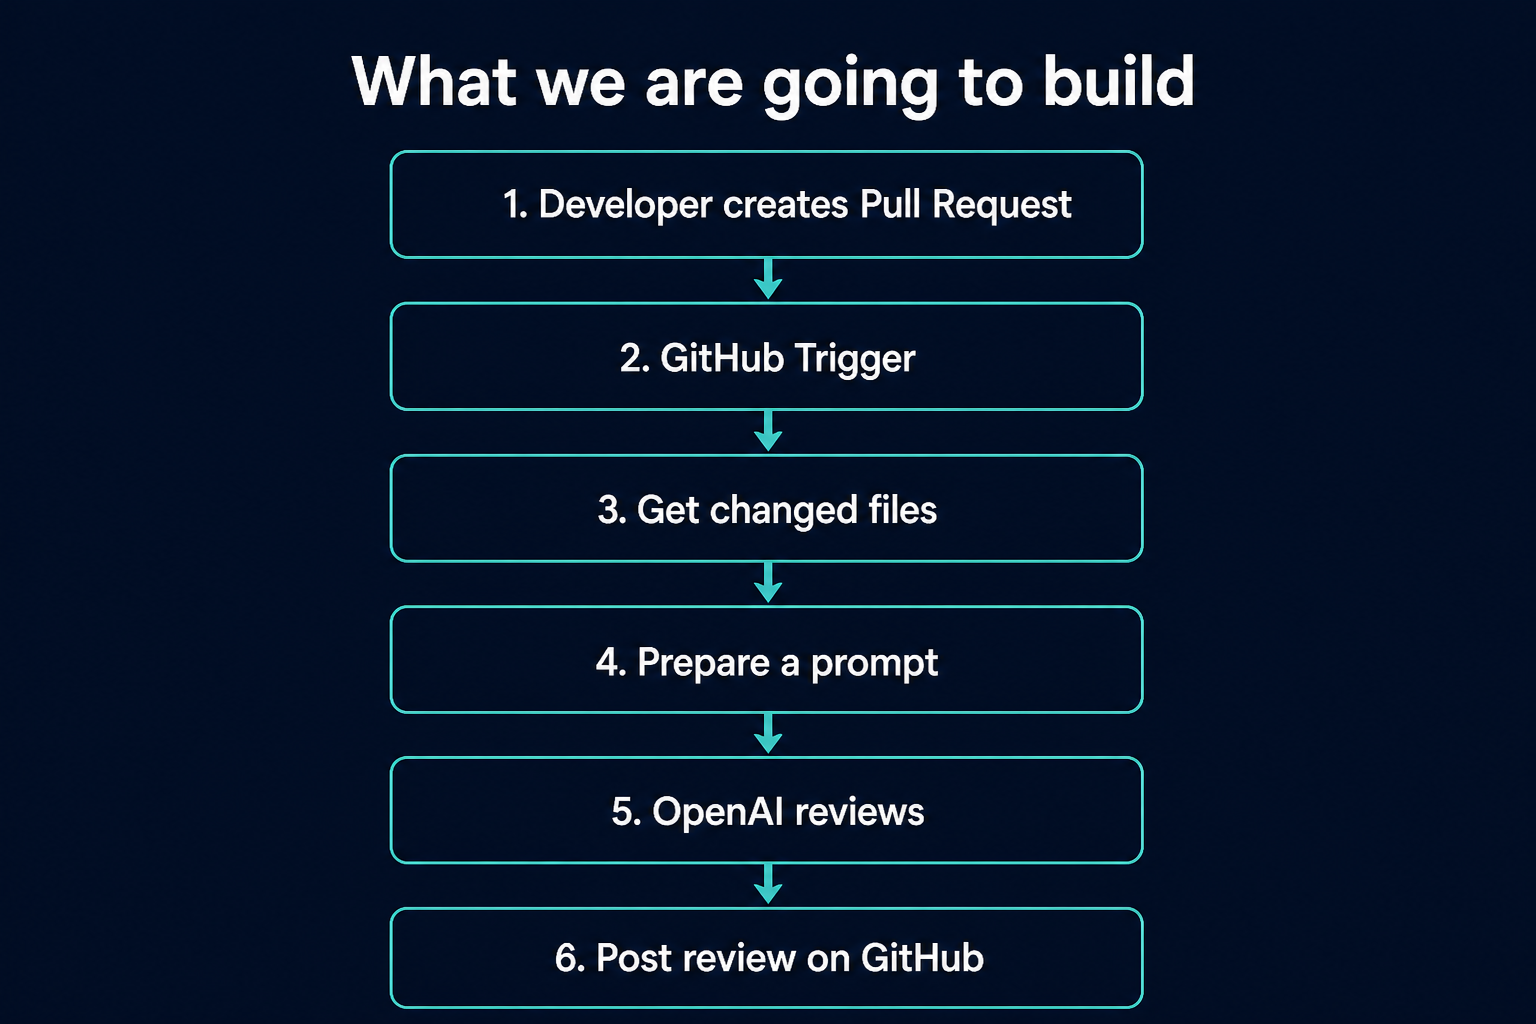
A developer creates a Pull Request → n8n gets the changed code → OpenAI reviews the code → n8n posts the AI feedback back to GitHub.
By the end of this lesson, you will understand how different tools can be connected together to build a useful AI automation.
What problem are we trying to solve?
Before building anything, let's understand the problem.
Imagine that your team uses GitHub to store its code.
A developer creates a new branch:
main
 |
 └── feature/update-deployment
They make some changes and then create a Pull Request (PR).
A Pull Request is basically the developer saying:
I changed some code. Can someone review it before we merge it into the main branch?
Normally, another engineer opens the Pull Request and checks the changes.
For example, they may look for:
- Security problems
- Hardcoded passwords or API keys
- Dangerous commands
- Incorrect configuration
- Missing error handling
- CI/CD problems
- Infrastructure mistakes
This review process is extremely important.
But it also takes time.
If a team receives many Pull Requests every day, engineers can spend a significant amount of time doing the first round of reviews.
This is where an LLM can help.
We can ask an AI model to perform a first-pass review.
The AI is not going to replace the engineer. Instead, it can quickly look through the changes and point out things that deserve human attention.
What are we going to build?
Our workflow will look like this:
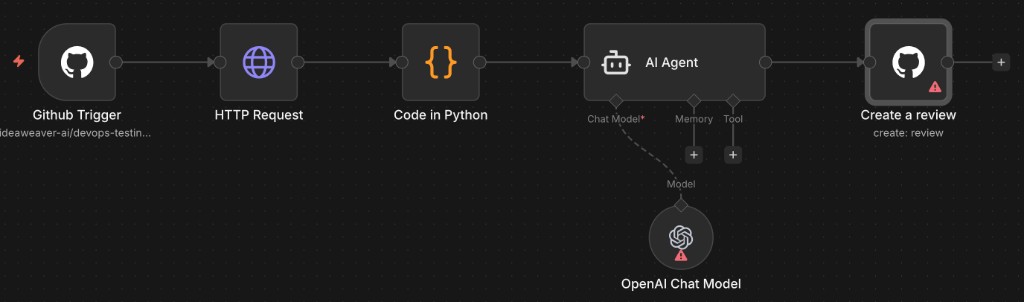
We will build this using five main n8n nodes:
- GitHub Trigger — detects that a Pull Request was created.
- HTTP Request — gets the actual code changes from GitHub.
- Code — converts those changes into a prompt for the LLM.
- AI Agent + OpenAI Chat Model — reviews the code.
- GitHub Create Review — posts the AI feedback on the Pull Request.
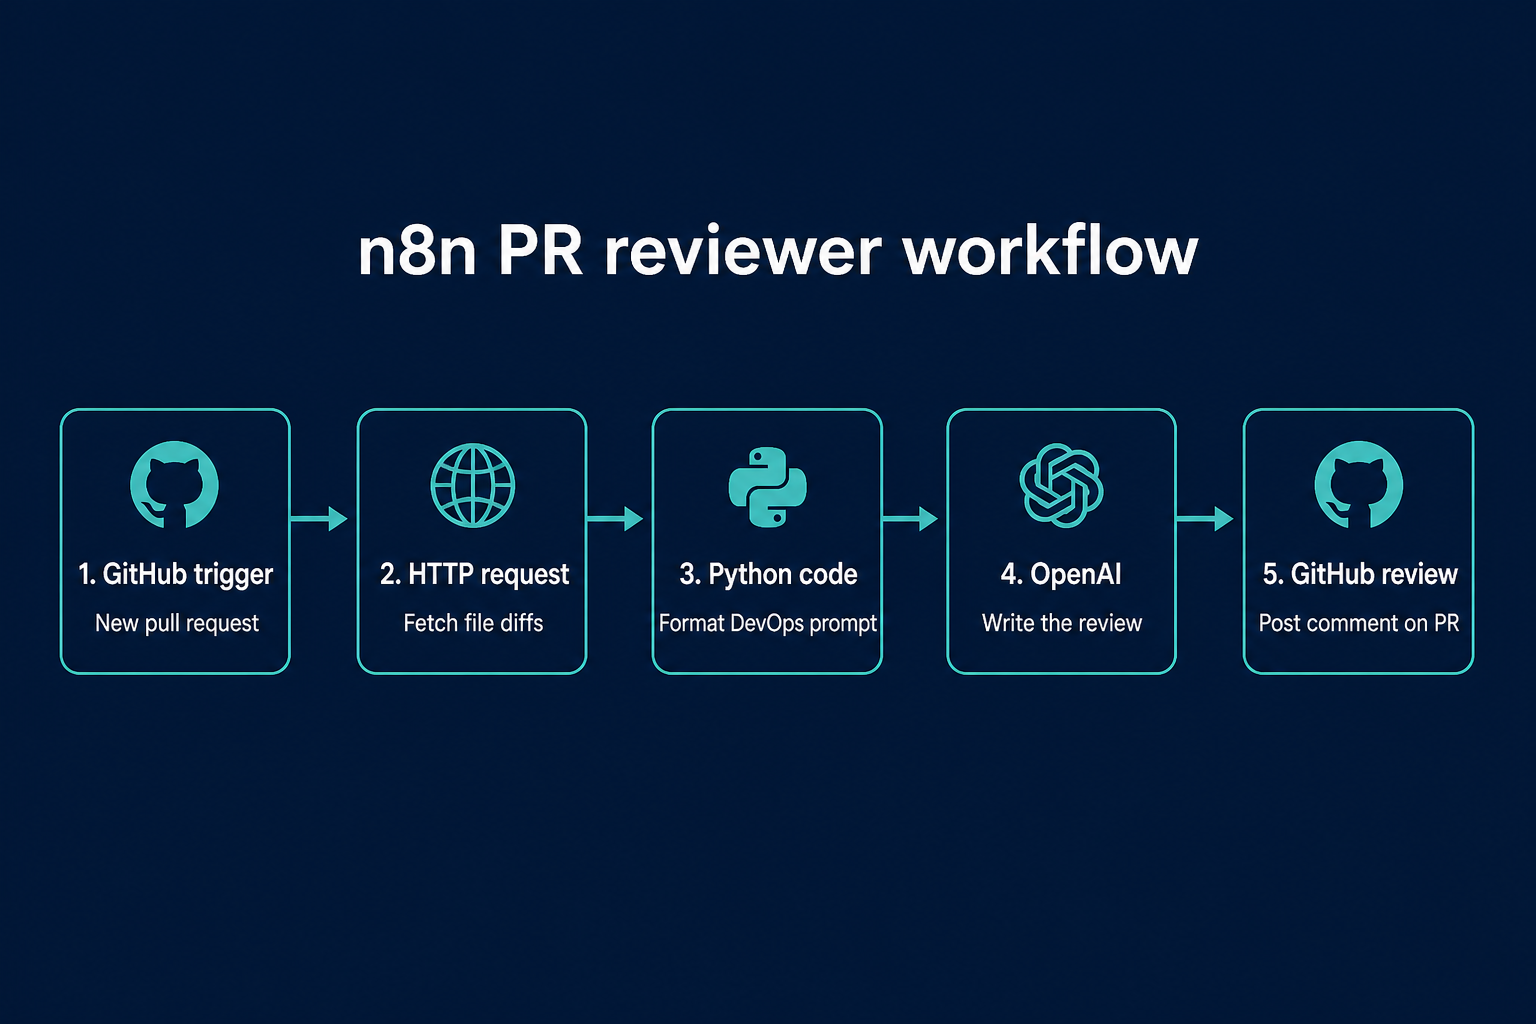
Don't worry if some of these terms are new. We will go through them one at a time.
First, what is n8n?
n8n is a workflow automation platform.
It allows us to connect different applications and APIs together.
Instead of writing an entire application from scratch, we can create a visual workflow using boxes called nodes.
Each box performs one task. In this lesson those boxes are GitHub, Python, OpenAI, then GitHub again.
In n8n, these boxes are called nodes.
A node might:
- Receive an event from GitHub
- Call an API
- Run Python code
- Send something to OpenAI
- Send a Slack message
- Write information back to GitHub
You connect these nodes together to create a workflow.
Three n8n concepts you should understand
Before building the workflow, let's understand three important concepts.
1. Nodes
A node represents one step in the workflow.
For example:
GitHub Trigger
might detect a new Pull Request.
The next node:
HTTP Request
might ask GitHub for the changed files.
The next node:
OpenAI
might review those changes.
Think of nodes as individual workers where each worker has one specific job.
2. Credentials
n8n sometimes needs permission to access another service.
For example, if n8n wants to access your GitHub repository, GitHub needs to know:
Is this application allowed to access this repository?
That is where credentials come in.
Instead of putting passwords or API keys directly inside your workflow, n8n stores them securely as credentials.
For this project, we need credentials for:
GitHub
OpenAI
3. Expressions
Expressions allow us to use information from previous nodes.
For example, suppose Pull Request number 8 is created.
We could hardcode:
pulls/8
But then our workflow would only work for PR #8.
Tomorrow somebody might create PR #9.
Next week it might be PR #25.
Instead, we tell n8n:
Get the Pull Request number from the GitHub Trigger.
This is called an expression.
So instead of:
PR = 8
we dynamically get:
PR = Pull Request number from GitHub
This makes the workflow reusable for every Pull Request.
Detect a new Pull Request
Our workflow needs to start when something happens.
In our case:
Start the workflow when a Pull Request is created or updated.
For this we use the GitHub Trigger node.
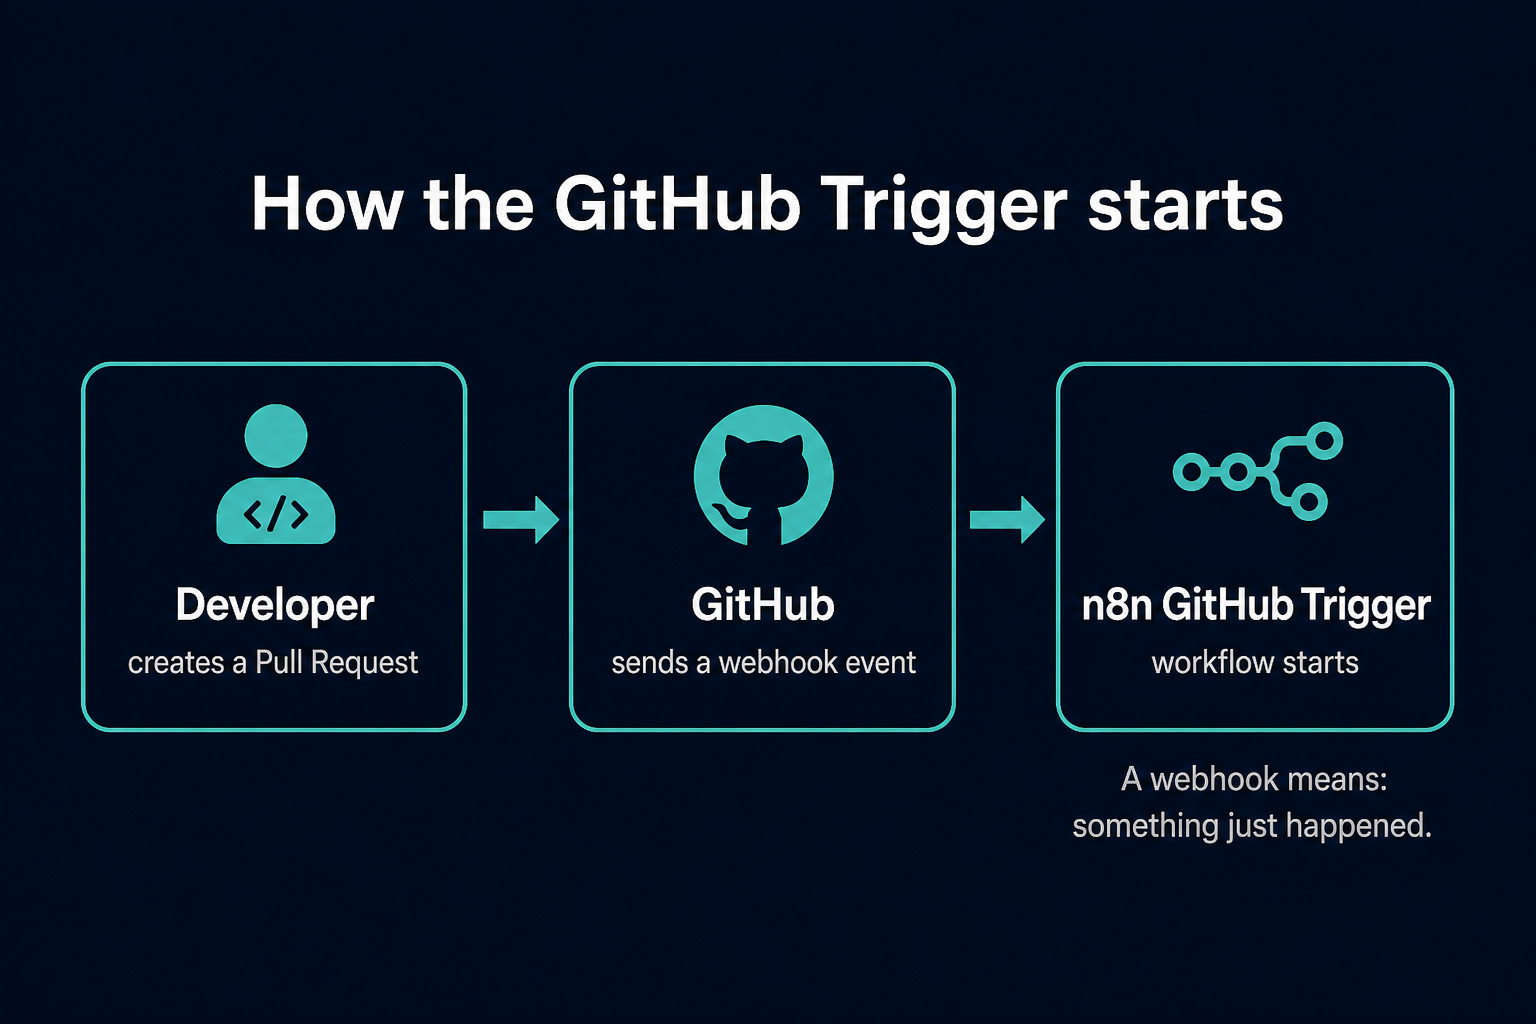
GitHub sends information about the Pull Request to n8n.
This is commonly called a webhook.
A webhook is simply one application telling another application:
Something just happened.
Here, GitHub tells n8n:
A Pull Request event just happened.
Configure the GitHub Trigger
Add a GitHub Trigger node.
Choose:
Event: Pull Request
Connect your GitHub account using OAuth.
Then select the repository you want to monitor.
For example:
Owner: ideaweaver-ai
Repository: devops-testing
Event: Pull Request
Now execute the node and create a test Pull Request.
GitHub will send information to n8n.
The output will be JSON.
You may see information such as:
action
number
repository
sender
html_url
For example:
action = opened
number = 8
repository = devops-testing
sender = prashant
There will be much more information in the real response.
Don't worry about understanding every field.
We only need a few pieces of information.
Pin Data
While building a workflow, you don't want to create a new Pull Request every time you test another node.
n8n provides a useful feature called Pin Data.
When you pin the GitHub Trigger output, n8n saves that sample response.
You can then continue building your workflow using the same data.
Think of it like taking a snapshot of a real GitHub event, then building the rest of the workflow on that saved test data.
When your workflow is ready, unpin the data and test it with a real Pull Request.
Get the actual code changes
At this point, GitHub has told us:
A Pull Request exists.
But we still need to know:
What code actually changed?
This distinction is important.
The GitHub Trigger mainly gives us information about the Pull Request.
For the AI reviewer, we need the actual changed files.
For that, we call the GitHub API.
What is an API?
An API allows one application to request information from another application.
For example, n8n can ask GitHub:
Give me the files changed in Pull Request #8.
GitHub provides an API endpoint for this:
GET /repos/{owner}/{repo}/pulls/{pull_number}/files
For example:
GET /repos/ideaweaver-ai/devops-testing/pulls/8/files
GitHub responds with information about the changed files.
For each file, we may receive information such as:
filename
status
additions
deletions
patch
The most important field for us is:
patch
The patch contains the actual lines that were added or removed.
Why do we need the patch?
Imagine a developer changes this:
path = "/var/log"
shutil.rmtree(path)
The AI needs to see those lines to identify the danger.
If we only tell the AI:
Pull Request #8 was created
there is nothing useful for the model to review.
We need to give it the code changes. The trigger says a Pull Request exists. The next node gets the actual code differences.
Configure the HTTP Request node
Add an HTTP Request node after the GitHub Trigger.
The request will call GitHub's API.
Conceptually:
https://api.github.com/repos/
        OWNER/
        REPOSITORY/
        pulls/
        PR_NUMBER/
        files
But we should not hardcode these values.
Instead, we get them from the GitHub Trigger.
For example:
Owner      → repository.owner.login
Repository → repository.name
PR Number  → number
The exact path may vary slightly depending on the GitHub Trigger output, so inspect the JSON produced by your trigger.
This is where n8n expressions become useful.
Why expressions matter
Suppose today we receive:
PR #8
Tomorrow:
PR #9
And later:
PR #100
Our workflow should work for all of them.
We don't want:
pulls/8/files
We want:
pulls/{PR_NUMBER}/files
where PR_NUMBER comes from the GitHub Trigger.
The same idea applies to the repository owner and repository name.
This makes the workflow dynamic.
Prepare the prompt
GitHub now gives us the changed files.
But there is another problem.
GitHub returns structured JSON.
An LLM works better if we give it a clear instruction.
For example:
You are a senior DevOps engineer.

Review the following code changes.

Look for:

- Security problems
- Hardcoded secrets
- Dangerous filesystem operations
- CI/CD problems
- Missing validation
- Infrastructure risks

Explain each issue clearly and suggest a safer solution.

Changed files:

...
We therefore need to convert GitHub's API response into a good prompt.
For this we use an n8n Code node.
Turn GitHub JSON into one prompt
Add a Code node and choose Python.
The purpose of this node is simple: take GitHub JSON, extract the changed files, combine the patches, add review instructions, and create one prompt.
You can think about this as a data transformation.
The Python code needs to:
- Read the changed files.
- Extract each filename.
- Extract each patch.
- Combine them.
- Add instructions for the AI reviewer.
- Return the final prompt.
The output might look like:
You are a senior DevOps engineer.

Review the following Pull Request.

Check for:

- security problems
- hardcoded secrets
- dangerous commands
- CI/CD mistakes
- filesystem risks
- missing validation

File: cleanup.py

Changes:

+ path = "/var/log"
+ shutil.rmtree(path)

Explain the problems and suggest safer alternatives.
Now we have something the LLM can actually understand and review.
The Python for this Code node is in the same GitHub repo: DevOps-GitHub-PR-Reviewer.
Send the prompt to OpenAI
Now we add the AI part.
Add an AI Agent and connect an OpenAI Chat Model.
You will need an OpenAI API credential.
n8n stores the API key inside its credential system so we don't need to put the key directly inside our workflow.
By this point the chain is: GitHub Trigger → HTTP Request → Code → AI Agent → OpenAI.
Inside the AI Agent, use an expression to pass the prompt created by the Code node.
The model receives something like:
You are a senior DevOps engineer.

Review these code changes...
and returns something like:
Potential issue:

The script recursively deletes /var/log.

This is dangerous because /var/log is a system directory.

Consider validating the path and preventing deletion of protected system directories.
That becomes our automated first-pass review.
Is this really an AI agent?
This is an important distinction.
The LLM itself is not calling GitHub.
n8n is calling GitHub.
The model only receives text and generates text.
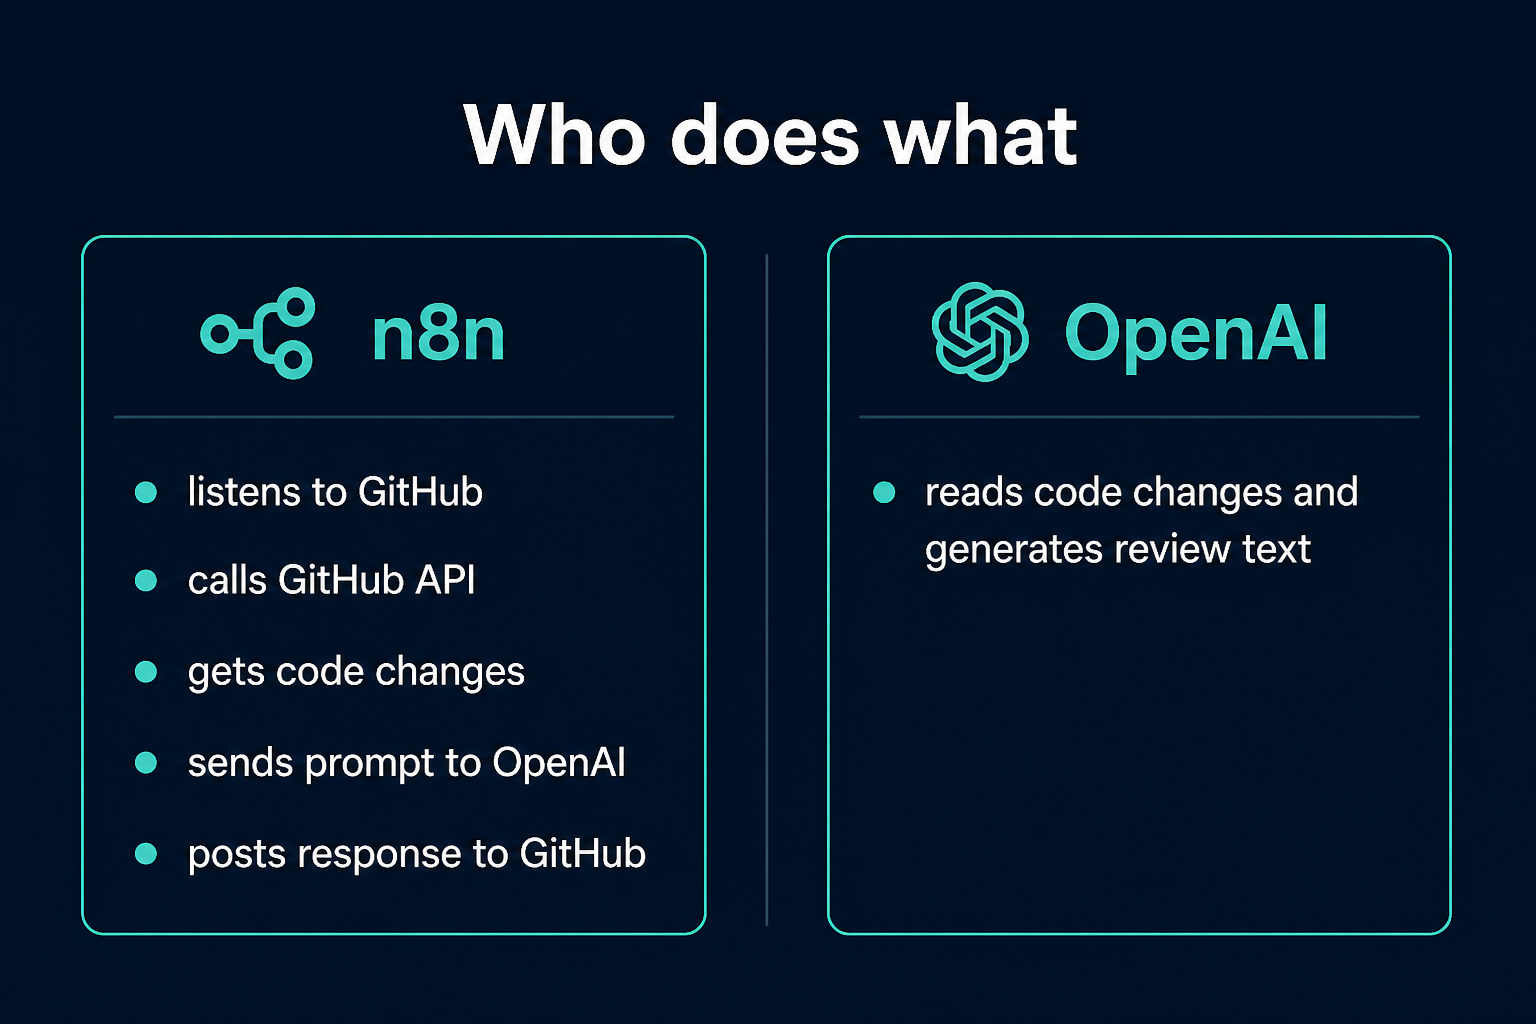
So n8n is responsible for the workflow and external actions.
The LLM is responsible for reasoning about the code.
Post the review back to GitHub
We now have the AI-generated review.
But it is still inside n8n.
We want developers to see it directly inside the Pull Request.
Add another GitHub node.
Choose:
Create a Review
We again dynamically provide:
Owner
Repository
Pull Request Number
Then use the output from the AI Agent as the review body.
COMMENT vs APPROVE
GitHub reviews can have different outcomes.
For our AI reviewer, we should use:
COMMENT
This means:
Here is some feedback about this Pull Request.
We should not automatically use APPROVE.
Why?
Because LLMs can make mistakes.
The AI may:
- Miss a security issue
- Misunderstand code
- Produce incorrect recommendations
- Hallucinate problems that don't exist
So our design should be:
AI → COMMENT
Human → final decision
not:
AI → APPROVE → Merge
The human engineer should remain responsible for approving and merging the Pull Request.
Complete workflow
We now have our complete pipeline, from a new Pull Request all the way to a COMMENT on GitHub, with a human still reviewing and merging.
This is a simple but useful example of connecting an LLM with real DevOps tools.
Testing our AI reviewer
We should intentionally create a bad Pull Request to see whether our reviewer catches the problem.
For example:
import shutil

path = "/var/log"

shutil.rmtree(path)
This code is extremely dangerous.
It recursively deletes:
/var/log
A useful AI review should identify problems such as:
Unsafe default path
Recursive deletion
No path validation
No protection for system directories
No existence checks
It should ideally suggest safer approaches as well.
If the model simply responds:
Looks good.
our prompt probably needs improvement.
We can make our instructions more specific about what the model should inspect.
This is a first-pass reviewer
The goal of this project is not to replace human code reviewers.
Think of the AI reviewer as an assistant.
It can quickly scan the Pull Request and say:
These three areas may need attention.
Then a human engineer performs the deeper review.
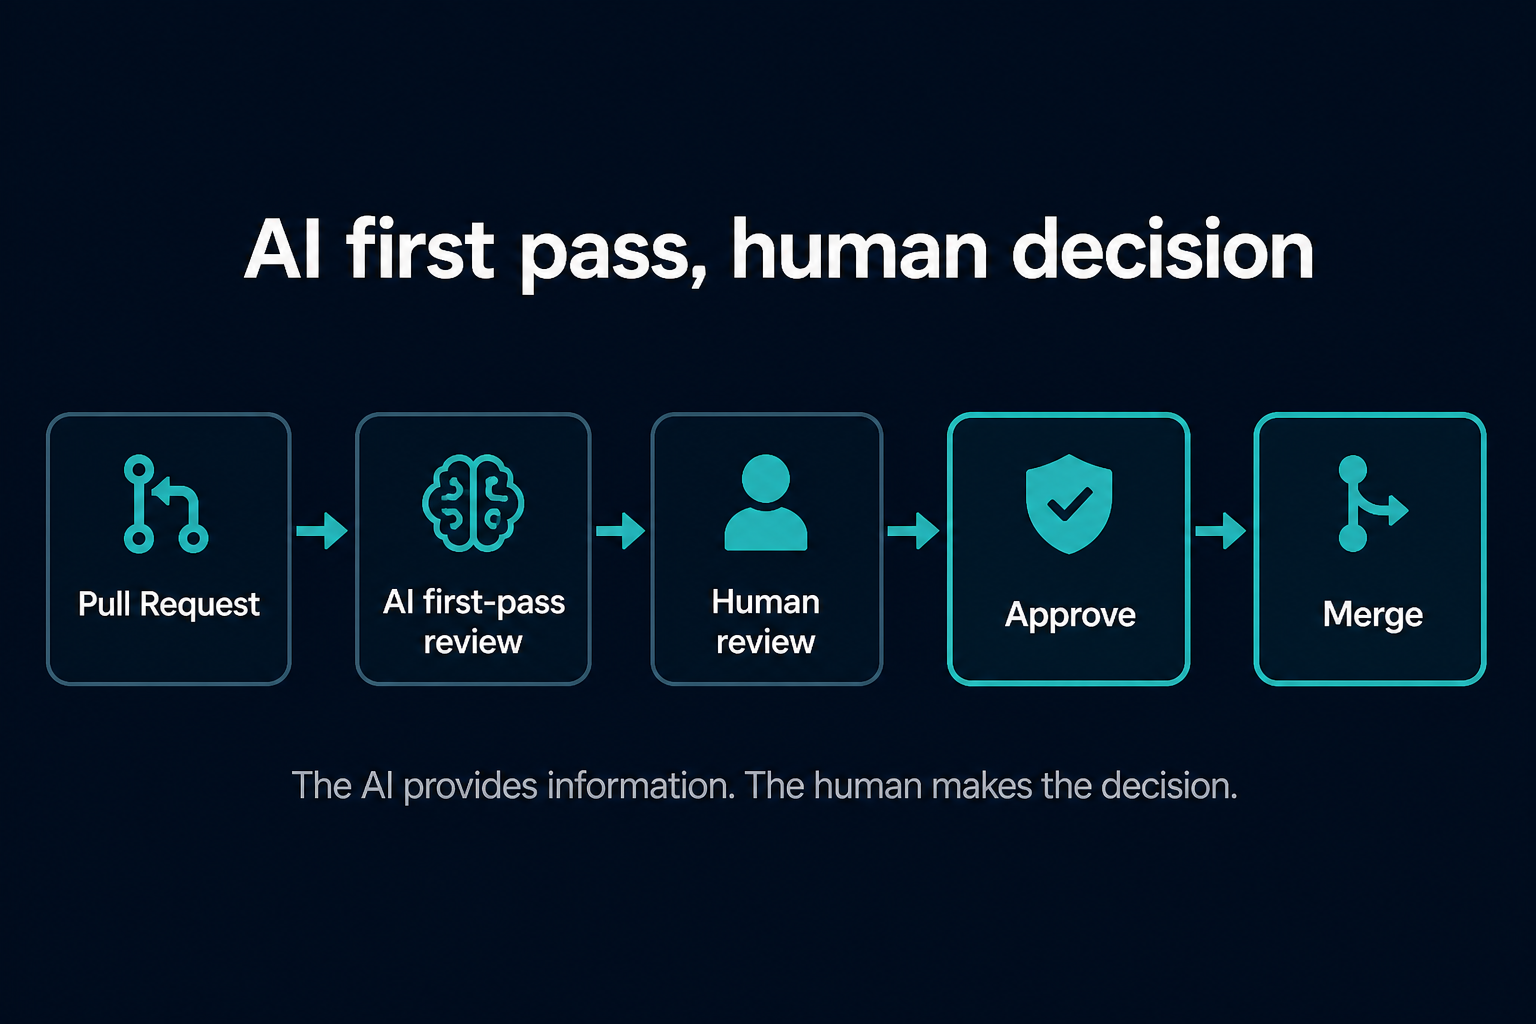
The AI provides additional information.
The human makes the decision.
Security considerations
This project is designed for learning.
If you wanted to use something similar in production, you would need additional protections.
For example:
- Restrict GitHub permissions
- Protect API keys
- Limit which repositories the bot can access
- Ignore extremely large generated files
- Handle API failures
- Handle rate limits
- Validate LLM output
- Protect against prompt injection
- Add logging and monitoring
- Limit token usage and cost
Most importantly, don't give an AI system permission to automatically approve and merge production code without proper controls.
What did we learn?
The most important part of this project is not the individual n8n nodes.
It is understanding how the pieces work together.
We built this pipeline:
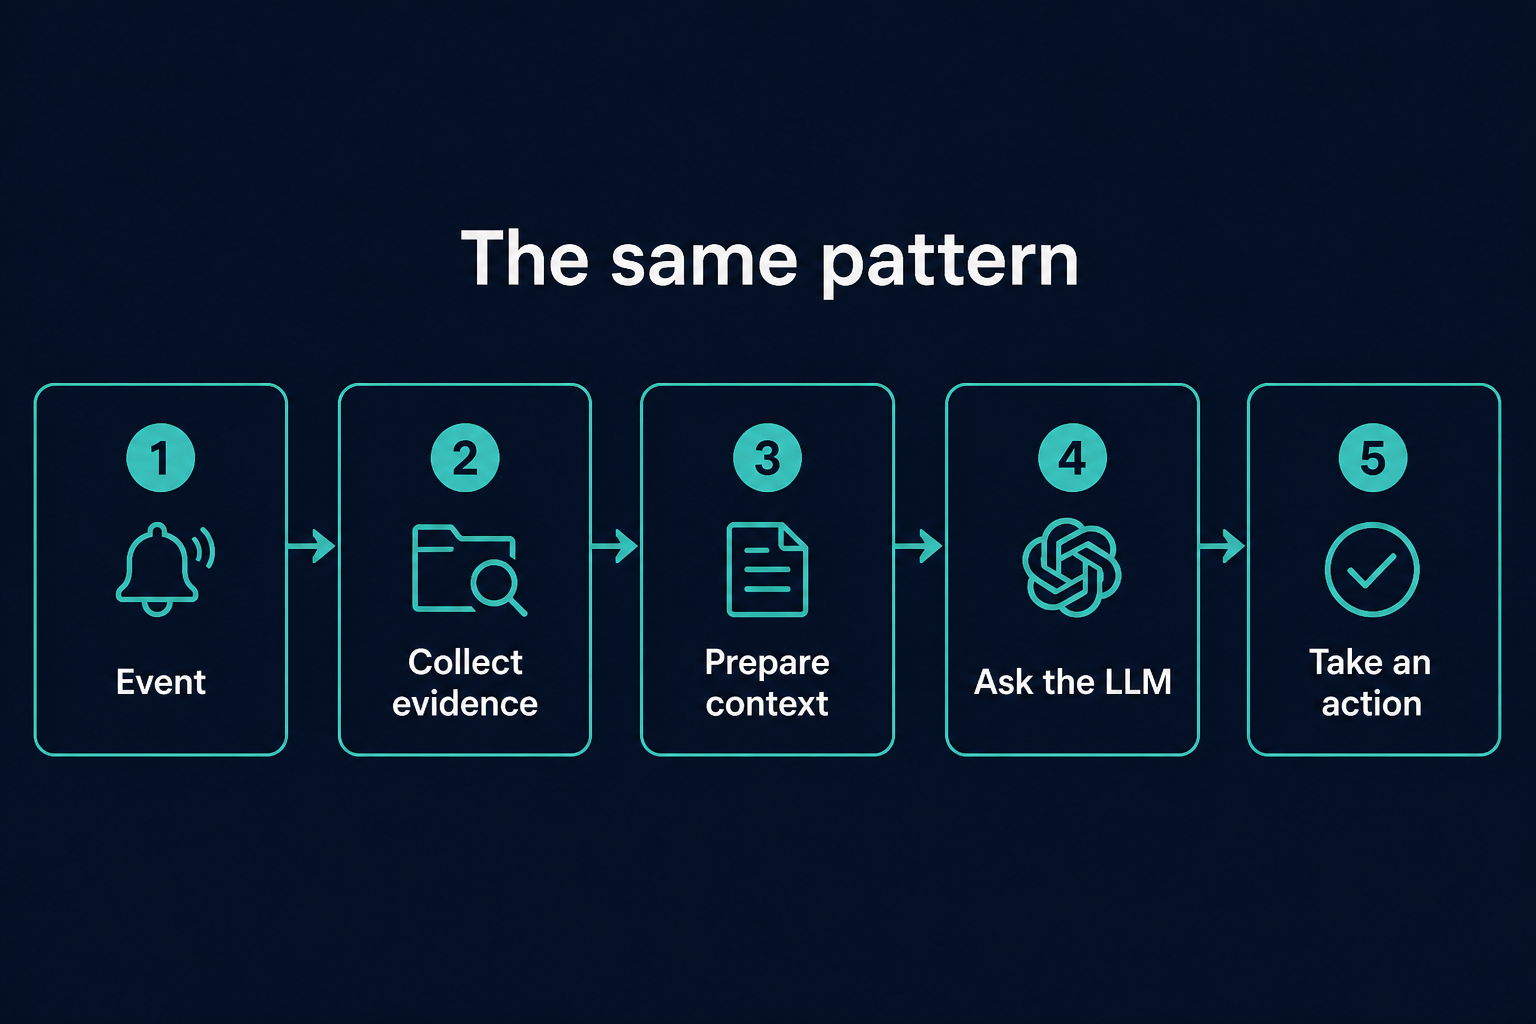
For our example: GitHub PR → get changed files → create a DevOps prompt → OpenAI reviews the code → post a GitHub comment.
This same pattern appears in many GenAI-for-DevOps applications.
For example:
Kubernetes alert
   ↓
Collect pod logs
   ↓
Send logs to LLM
   ↓
Generate RCA
   ↓
Post to Slack
or:
AWS alarm
   ↓
Collect CloudWatch logs
   ↓
Send evidence to LLM
   ↓
Generate troubleshooting suggestions
   ↓
Create incident report
Once you understand this pattern, you can build many different AI-powered DevOps workflows.
Five things to remember
1. n8n connects the tools together.
GitHub, Python, OpenAI, Slack, APIs, and many other systems can become nodes in a workflow.
2. The GitHub Trigger tells us that something happened.
In our example, a Pull Request was created or changed.
3. The GitHub Files API gives us the actual code changes.
The trigger gives us metadata. The Files API gives us the evidence the AI needs to review.
4. The Code node prepares the information for the LLM.
It converts GitHub's structured data into a clear DevOps review prompt.
5. AI provides feedback; humans make the final decision.
Use the AI review as a COMMENT, not as automatic approval.
If you remember only one diagram from this lesson, remember this
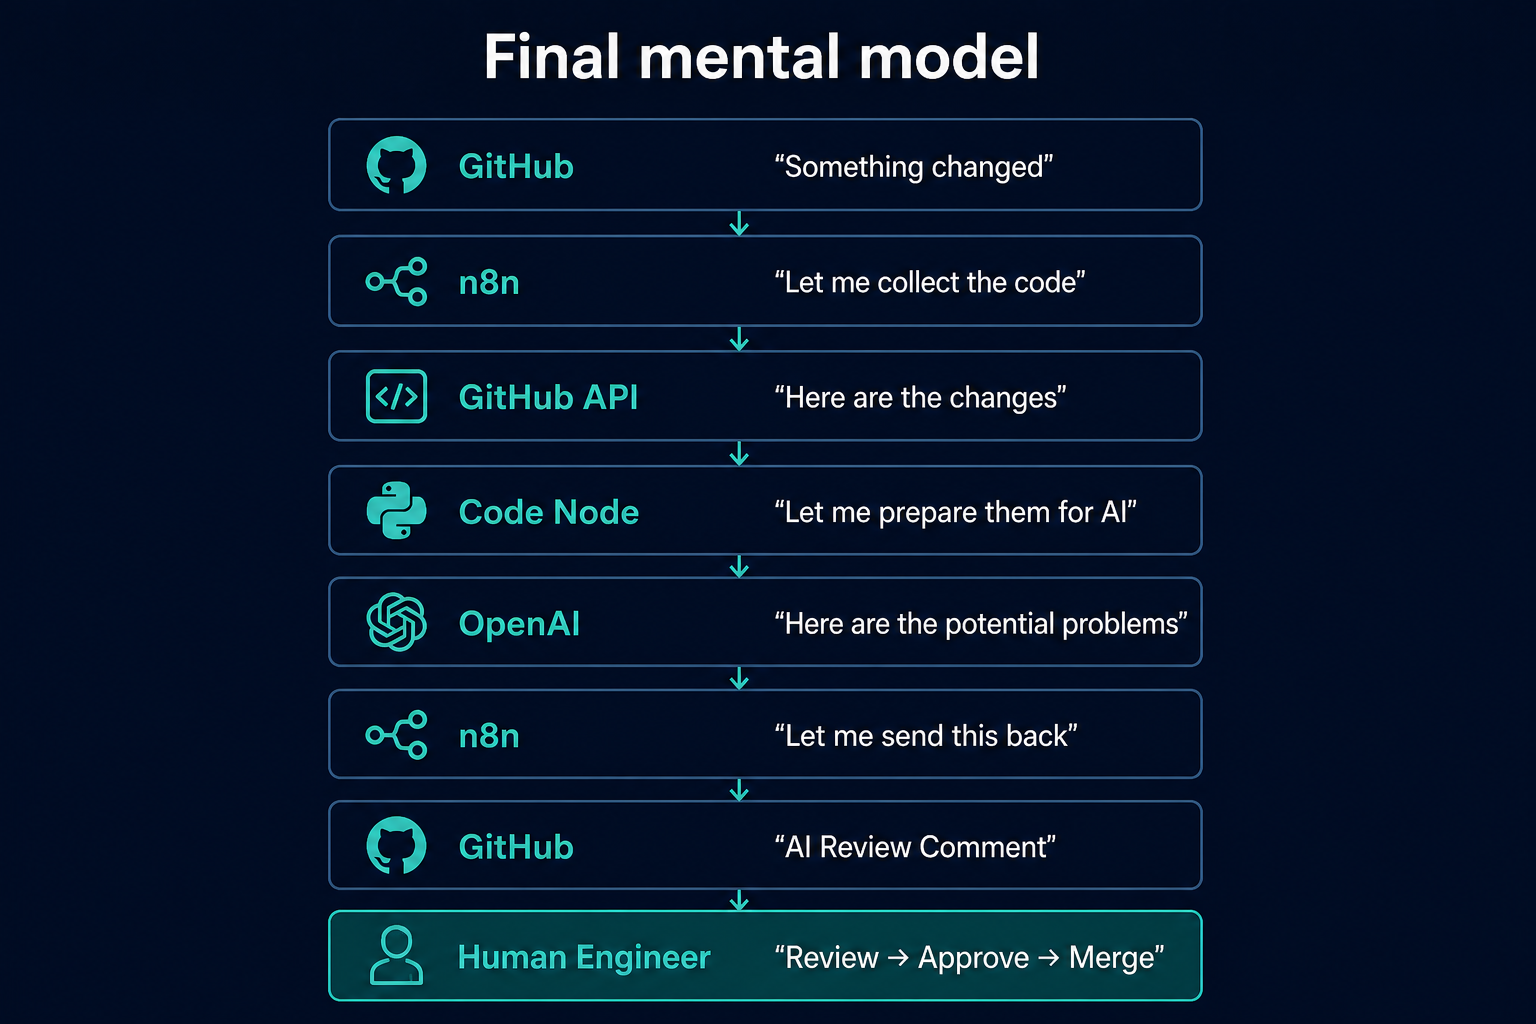
The most important idea is simple:
n8n handles the workflow and tools. The LLM analyzes the information. The human makes the final decision.
That is our first practical AI-powered DevOps workflow.